Best Homemade Cinnamon Rolls – Melt-in-Your-Mouth Recipe
BEST Homemade Cinnamon Rolls are more than just a breakfast pastry; they’re a warm hug in edible form, a nostalgic trip back to cozy mornings, and a testament to the simple joy of creating something truly delicious from scratch. There’s an undeniable magic in the way soft, pillowy dough, swirled with fragrant cinnamon and rich brown sugar, bakes into perfection. What truly sets these BEST Homemade Cinnamon Rolls apart is the irresistible combination of textures and flavors: that slightly crisp edge giving way to a tender, gooey center, all topped with a dreamy, sweet glaze that melts into every nook and cranny. Forget store-bought imposters; this recipe will guide you through creating cinnamon rolls so heavenly, they’ll become your new go-to treat for any occasion, guaranteed to fill your home with the most comforting aroma imagin extractable.
The BEST Homemade Cinnamon Rolls
There’s something undeniably magical about a warm, gooey cinnamon roll fresh from the oven. The aroma alone is enough to transport you to a state of pure bliss. While store-bought versions can be tempting, nothing – absolutely nothing – compares to the joy of biting into a homemade masterpiece. Today, I’m going to walk you through creating what I truly believe are the best homemade cinnamon rolls you’ll ever taste. We’re talking about a perfectly tender dough, a generous swirl of spiced sugar, and a decadent cream cheese frosting that will have you coming back for seconds, and maybe even thirds! Don’t be intimidated; with a little patience and these clear instructions, you’ll be a cinnamon roll pro in no time.
Ingredients:
Making the Dough: The Foundation of Flavor
The secret to incredibly soft and fluffy cinnamon rolls lies in the dough. We’re going to create a rich, enriched dough that’s a joy to work with and even more of a joy to eat.
Step 1: Activate the Yeast and Combine Wet Ingredients
In a large mixing bowl, or the bowl of your stand mixer fitted with a dough hook, combine the 3/4 cup of water and 1/2 cup of whole milk. Gently warm this mixture until it’s lukewarm – not hot, as that can kill the yeast. You can do this in the microwave in 15-second increments, stirring in between, or by heating it in a small saucepan. Once lukewarm, stir in the granulated sugar and the instant yeast. Give it a gentle whisk and let it sit for about 5-10 minutes. You should see the yeast start to bloom and become foamy, indicating it’s active and ready to work its magic. While the yeast is blooming, melt the 1/4 cup of butter in a small saucepan or the microwave. Once melted, let it cool slightly before adding it to the yeast mixture. Now, add the room-temperature large egg to the wet ingredients and whisk everything together until well combined.
Step 2: Incorporate Flour and Salt to Form the Dough
Add 4 cups of the all-purpose flour and the salt to the wet ingredients. If you’re using a stand mixer, start mixing on low speed until the ingredients just begin extract to come together. If you’re mixing by hand, use a wooden spoon or spatula to stir until a shaggy dough forms. Now, increase the mixer speed to medium (or continue mixing by hand, which will require a bit more effort!). Gradually add more flour, about 1/4 cup at a time, only as needed, until the dough pulls away from the sides of the bowl and forms a relatively smooth, slightly sticky ball. Be careful not to add too much flour, as this will result in dry, tough rolls. The dough should feel soft and pliable. Knead the dough for about 6-8 minutes in the stand mixer, or 10-12 minutes by hand on a lightly floured surface. You’re looking for a smooth, elastic dough that springs back slowly when you poke it.
Step 3: The First Rise – Patience is a Virtue
Lightly grease a clean large bowl with a little oil or cooking spray. Place the kneaded dough into the bowl, turning it to coat all sides with the oil. Cover the bowl tightly with plastic wrap or a clean kitchen towel. Find a warm, draft-free spot for the dough to rise. An oven that has been turned off but still retains a little residual warmth is perfect, or simply a sunny windowsill. Let the dough rise for 1 to 1 1/2 hours, or until it has doubled in size. This is crucial for developing that wonderful soft texture and slightly sweet flavor.
Assembling and Baking Your Cinnamon Rolls: The Sweet Swirl
Once your dough has had its first glorious rise, it’s time to create those irresistible cinnamon swirls.
Step 4: Rolling, Filling, and Rolling Again!
Gently punch down the risen dough to release the air. Turn the dough out onto a lightly floured surface. Now, roll the dough into a large rectangle, approximately 12×18 inches. Try to keep the thickness as even as possible. In a small bowl, combine the 6 tablespoons of very soft butter with the packed brown sugar and ground cinnamon. This is your glorious filling! Spread this mixture evenly over the rolled-out dough, leaving about a 1/2-inch border on one of the long edges. This border will help seal the roll. Starting from the long edge opposite the border, tightly roll up the dough, jelly-roll style. Try to keep the roll as even and compact as possible. Once rolled, pinch the seam to seal it well.
Step 5: Slicing and the Second Rise
Using a sharp knife or dental floss (which gives a cleaner cut!), slice the log into 12 equal rolls. To use floss, slide a piece under the log, cross the ends over the top, and pull gently to slice. Place the cinnamon rolls into a greased 9×13 inch baking pan, leaving a little space between them as they will expand further. Cover the pan loosely with plastic wrap or a kitchen towel and let them rise again in a warm place for another 30-45 minutes, or until they are visibly puffed up and touching each other. This second rise is essential for achieving that light, airy texture.
Step 6: Baking to Golden Perfection
Preheat your oven to 375°F (190°C). Remove the plastic wrap or towel from the pan of cinnamon rolls and bake for 20-25 minutes, or until they are golden brown on top and cooked through. The centers should be set and not doughy. If the tops start to brown too quickly before the insides are cooked, you can loosely tent the pan with aluminum foil. Let the rolls cool in the pan for about 10 minutes before frosting.
The Cream Cheese Frosting: The Icing on the Cake
No cinnamon roll is complete without a luscious, creamy frosting. This cream cheese frosting is the perfect complement to the sweet, spiced dough.
Step 7: Whipping Up the Dreamy Frosting
While the rolls are cooling slightly, prepare the frosting. In a medium bowl, beat together the room-temperature cream cheese and the 5 tablespoons of room-temperature butter until smooth and creamy. This is best done with an electric mixer, but can also be achieved with a whisk and some elbow grease. Gradually add the powdered sugar, about 1/2 cup at a time, mixing until it’s fully incorporated. Add the pure vanilla extract and continue to mix until the frosting is smooth and luscious. If the frosting seems too thick, you can add a teaspoon or two of milk or cream to reach your desired consistency.
Step 8: Frosting and Enjoying the Fruits of Your Labor!
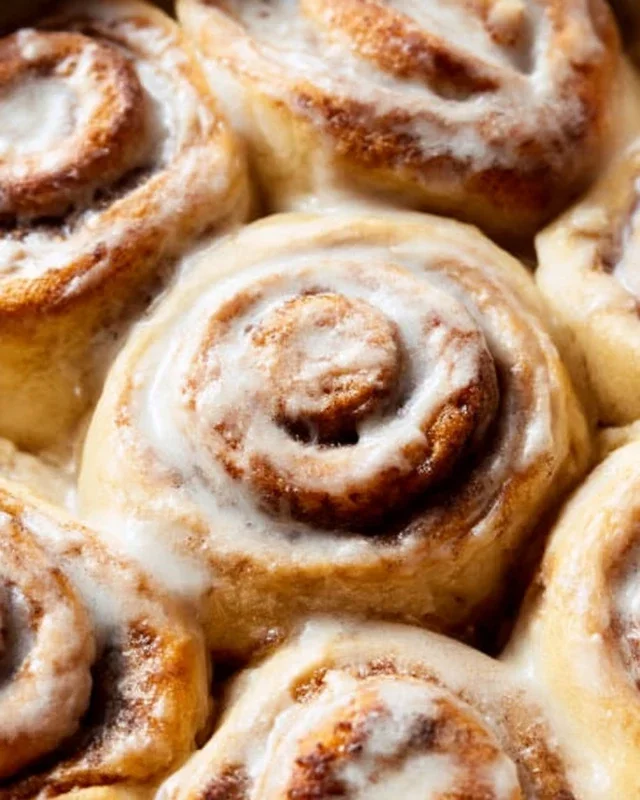
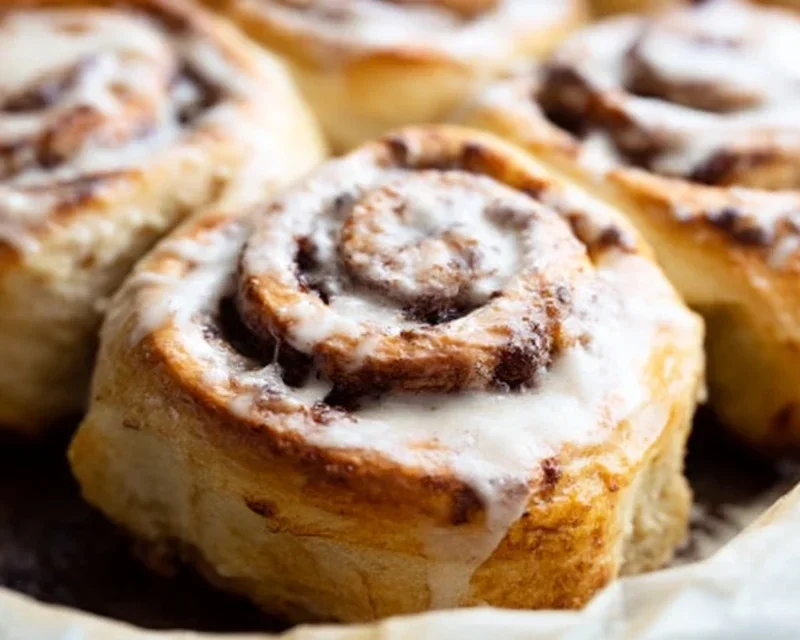
Once the cinnamon rolls have cooled for about 10 minutes, generously spread the warm cream cheese frosting over the tops. The residual heat from the rolls will help the frosting melt slightly, creating a beautiful glaze. Serve them warm and watch them disappear! These are best enjoyed fresh, but any leftovers can be stored in an airtight container at room temperature for a day or two, or in the refrigerator for longer. Reheat gently in the microwave for a few seconds to bring back that amazing warmth. Enjoy every delicious bite!
Conclusion:
There you have it – the blueprint for the BEST homemade cinnamon rolls! These aren’t just any cinnamon rolls; they’re a labor of love that promises an incredibly tender dough, a perfectly spiced cinnamon-sugar filling, and a luscious cream cheese frosting that ties it all together. The aroma that fills your kitchen as they bake is simply irresistible, creating an experience that’s far more rewarding than any store-bought treat. Imagin extracte pulling a warm, gooey roll from the oven, the frosting slowly melting into the swirls. It’s pure bliss!
These delights are perfect for a lazy weekend brunch, a special occasion breakfast, or even an afternoon pick-me-up with a cup of coffee or tea. For serving, I love them slightly warm, allowing the frosting to be delightfully melty. If you’re feeling adventurous, consider adding chopped pecans or walnuts to the filling for an extra crunch, or a hint of orange zest to the frosting for a brighter flavor profile. Don’t be intimidated by the process; baking these BEST homemade cinnamon rolls is incredibly satisfying, and the results are absolutely worth it. I truly encourage you to give this recipe a try – you won’t be disappointed!
Frequently Asked Questions:
Can I make the dough ahead of time?
Absolutely! You can prepare the dough and let it do its first rise in the refrigerator overnight. This will slow down the fermentation and develop even more flavor. Just bring it to room temperature for about an hour before proceeding with shaping and baking.
My frosting is too thick/thin, what can I do?
If your cream cheese frosting is too thick, gradually whisk in a tiny bit more milk or cream (a teaspoon at a time) until you reach your desired consistency. If it’s too thin, add a little more powdered sugar, again, a tablespoon at a time, until it thickens up beautifully.
BEST Homemade Cinnamon Rolls
Fluffy, soft, and perfectly spiced homemade cinnamon rolls with a decadent cream cheese frosting.
Ingredients
-
4-5 cups (520g-650g) all-purpose flour, spooned and leveled
-
1/4 cup (50g) granulated sugar
-
2 1/4 teaspoons (1 package) instant yeast
-
1/2 teaspoon salt
-
3/4 cup (180mL) water
-
1/2 cup (120mL) whole milk
-
1/4 cup (60g) unsalted butter, cut into 4 slices
-
1 large egg, at room temperature
-
6 tablespoons (85g) unsalted butter, very soft
-
3/4 cup (150g) packed brown sugar, light or dark
-
1 1/2 tablespoons ground cinnamon
-
4 oz (115g) full fat block cream cheese, room temperature
-
5 tablespoons (70g) unsalted butter, room temperature
-
1 1/2 cups (195g) powdered sugar
-
1 teaspoon pure vanilla extract
Instructions
-
Step 1
In a large bowl, whisk together 4 cups of the flour, granulated sugar, yeast, and salt. In a small saucepan, heat the water, milk, and 1/4 cup butter until the butter is melted and the mixture is warm but not hot (about 110°F/43°C). Pour the wet ingredients into the dry ingredients and add the egg. Mix until a shaggy dough forms. Turn the dough out onto a lightly floured surface and knead for 8-10 minutes, adding more flour as needed, until smooth and elastic. Place the dough in a lightly greased bowl, cover, and let rise in a warm place for 1-1.5 hours, or until doubled in size. -
Step 2
Punch down the dough and turn it out onto a lightly floured surface. Roll into a 12×18 inch rectangle. Spread the 6 tablespoons of very soft butter evenly over the dough, leaving a small border. In a separate bowl, mix together the brown sugar and cinnamon. Sprinkle the cinnamon-sugar mixture evenly over the buttered dough. -
Step 3
Starting from one of the long sides, tightly roll up the dough. Pinch the seam to seal. Cut the roll into 12 equal slices. -
Step 4
Place the cinnamon roll slices into a greased 9×13 inch baking pan, cut-side up. Cover loosely and let rise for another 30-45 minutes, or until puffy. -
Step 5
Preheat oven to 350°F (175°C). Bake the cinnamon rolls for 20-25 minutes, or until golden brown and cooked through. -
Step 6
While the rolls are baking, prepare the frosting. In a medium bowl, beat together the cream cheese and 5 tablespoons of room temperature butter until smooth. Add the powdered sugar and vanilla extract and beat until well combined and smooth. If the frosting is too thick, add a tablespoon of milk or water at a time until desired consistency is reached. -
Step 7
Once the cinnamon rolls are out of the oven, let them cool slightly for a few minutes before spreading the cream cheese frosting generously over the warm rolls.
Important Information
Nutrition Facts (Per Serving)
It is important to consider this information as approximate and not to use it as definitive health advice.
Allergy Information
Please check ingredients for potential allergens and consult a health professional if in doubt.