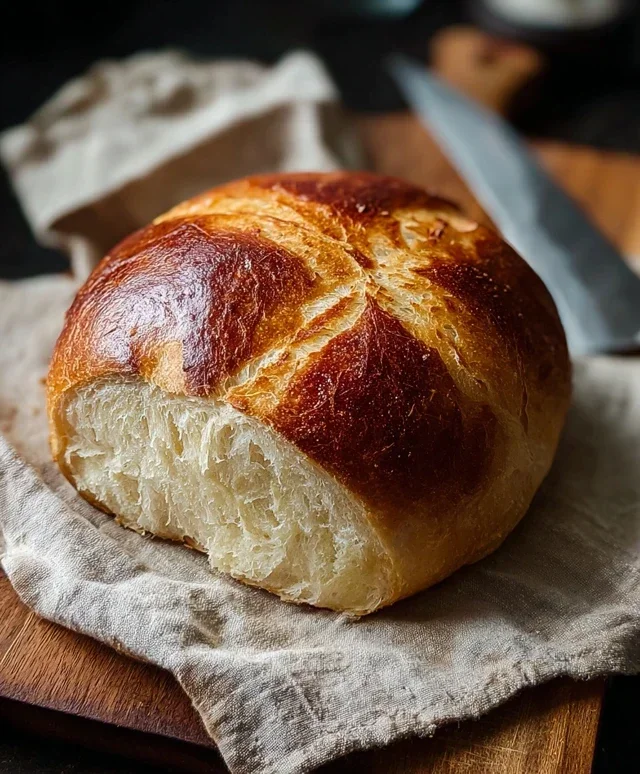
Easy Homemade Bread Recipe – Simple & Delicious Results
Easy homemade bread is a culinary dream that’s surprisingly within reach for even the most novice bakers. Forget those intimidating recipes filled with complex techniques and exotic ingredients. We’re talking about a simple, satisfying journey that culminates in the aroma of freshly baked bread filling your entire home – a scent that instantly evokes warmth, comfort, and a sense of accomplishment. There’s something truly magical about taking a few basic ingredients and transforming them into a delicious loaf that’s perfect for dipping in soup, slathering with butter, or simply tearing apart to enjoy its fluffy interior and delightfully crisp crust. This recipe for easy homemade bread is designed to demystify the baking process, making it accessible and enjoyable for everyone. It’s the kind of bread that proves you don’t need a professional kitchen to create something truly special and delicious right in your own home. Get ready to impress yourself and your loved ones with your very own, incredibly easy homemade bread!
Easy Homemade Bread
There’s something incredibly rewarding about pulling a warm, crusty loaf of homemade bread out of the oven. The aroma that fills your kitchen is simply non-intoxicating, and the taste? Well, it’s a million miles away from anything you can buy at the store. For years, I thought making bread was a complicated, time-consuming endeavor that required a professional baker’s touch. I was wrong! This recipe for easy homemade bread has completely changed my mind, and I’m so excited to share it with you. It’s surprisingly simple, uses just a handful of common ingredients, and delivers fantastic results every single time. Whether you’re a complete begin extractner or looking for a no-fuss recipe, this is the one for you.
Ingredients:
Instructions:
Mixing the Dough
The first step is to activate the yeast and get our dough started. In a large mixing bowl, combine the warm water and the instant yeast. Give it a gentle stir. You don’t need to see a ton of foam; instant yeast is designed to work directly in the dough, but a quick mix ensures it’s distributed. Let this sit for about 5 minutes. While you wait, measure out your flour and salt. This brief resting period allows the yeast to wake up and start doing its magic. After 5 minutes, add the 3 cups of bread flour and the 2 ½ teaspoons of kosher salt to the bowl with the water and yeast mixture. Use a sturdy spoon or a spatula to stir everything together until a shaggy dough forms. It will look rough and a bit sticky – that’s perfectly normal! Don’t worry about developing the gluten at this stage; we’ll get to that next.
Kneading the Dough
Now comes the kneading part, which is crucial for developing the gluten structure that gives bread its characteristic chegrape juicess and rise. Lightly flour a clean work surface. Turn the shaggy dough out onto the floured surface. Begin extract kneading by pushing the dough away from you with the heels of your hands, then folding it back towards you. Rotate the dough a quarter turn and repeat. Initially, the dough will be sticky. Resist the urge to add too much extra flour, as this can make your bread dry. Instead, use your bench scraper if needed, or just keep kneading. As you continue, the dough will become smoother, more elastic, and less sticky. This process typically takes about 8-10 minutes. You’re looking for a dough that is smooth, pliable, and springs back slowly when you gently poke it. If you have a stand mixer with a dough hook, you can knead it on medium-low speed for about 6-8 minutes until it passes the windowpane test (where you can stretch a small piece of dough thinly enough to see light through it without it tearing).
First Rise (Bulk Fermentation)
Once your dough is nicely kneaded, it’s time for its first rise. Lightly grease a clean, large bowl with a little bit of olive oil or cooking spray. Place the kneaded dough into the bowl, turning it once to coat the surface with oil. This helps prevent a dry skin from forming. Cover the bowl tightly with plastic wrap or a damp kitchen towel. Find a warm, draft-free spot for the dough to rise. This could be a slightly warmed oven (turned off after being heated for a minute or two), on top of your refrigerator, or just a cozy corner of your kitchen. Let the dough rise for 1 to 1 ½ hours, or until it has doubled in size. The exact time will depend on the temperature of your kitchen. You’ll know it’s ready when it looks puffy and jiggly, and if you gently poke it with a floured finger, the indentation should remain.
Shaping the Loaf
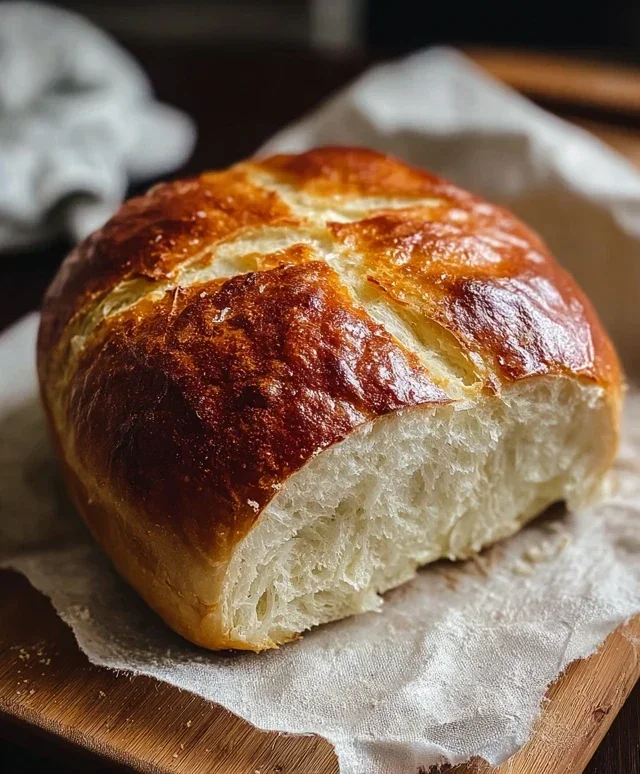
After the first rise, gently punch down the dough to release the air bubbles. Turn the dough out onto a lightly floured surface. Now it’s time to shape your loaf! For a classic round loaf (boule), gently flatten the dough into a rough circle. Then, fold the edges into the center, pinching them together to create a taut surface. Flip the dough over so the seam side is down. Cup your hands around the dough and gently pull it towards you, rotating it to create tension on the surface, forming a smooth, round ball. If you prefer a loaf pan shape, gently flatten the dough into a rectangle and then roll it up tightly from one of the long sides, pinching the seam to seal it. Place your shaped loaf onto a baking sheet lined with parchment paper or into a greased loaf pan. If you’re using a baking sheet, you might want to sprinkle it with a little cornmeal or semolina for extra texture.
Second Rise and Baking
Cover the shaped loaf loosely with plastic wrap or a clean kitchen towel. Let it rise again for about 30-45 minutes, or until it has visibly puffed up and looks almost doubled again. While the loaf is on its second rise, preheat your oven to 425°F (220°C). If you want to achieve a really nice, crispy crust, consider placing a baking dish filled with about an inch of hot water on the bottom rack of your oven while it preheats. This creates steam, which is fantastic for bread crust development. Once the oven is preheated and the loaf has completed its second rise, carefully remove the steam pan (if you used one) and place your loaf into the hot oven. Bake for 30-35 minutes. The bread is done when it’s a beautiful golden brown color and sounds hollow when you tap the bottom. If you have an instant-read thermometer, the internal temperature should be around 200-210°F (93-99°C). Once baked, transfer the loaf to a wire rack to cool completely. This is arguably the hardest part – waiting! Cooling allows the internal structure of the bread to set properly, so resist the urge to slice into it too soon. Enjoy your delicious, homemade bread!
Conclusion:
There you have it – truly easy homemade bread that’s incredibly rewarding to make! This recipe is fantastic because it demystifies bread baking, proving that you don’t need special skills or equipment to create a delicious loaf from scratch. The aroma filling your kitchen is just the begin extractning; the taste and texture of fresh, warm bread are unparalleled. It’s perfect for a comforting breakfast with butter and jam, a hearty side to soups and stews, or the base for amazing sandwiches. Don’t be afraid to experiment with variations! You can add herbs like rosemary or thyme to the dough, sprinkle seeds on top before baking, or even mix in a handful of cheese for a savory twist. I wholeheartedly encourage you to give this easy homemade bread a try. You might be surprised at just how simple and satisfying it is!
Frequently Asked Questions:
Why is my bread dense?
A common reason for dense bread is not allowing enough time for the yeast to activate and the dough to rise sufficiently. Ensure your yeast is fresh and that the dough is kept in a warm place to rise. Overworking the dough can also contribute to a dense texture.
Can I make this bread without a stand mixer?
Absolutely! This recipe is designed to be kneaded by hand. While a stand mixer makes the process quicker, the satisfaction of kneading your dough yourself is immense, and it yields wonderful results. Just be prepared for a good arm workout!
Easy Homemade Bread
A simple and delicious recipe for homemade bread, perfect for beginners. Uses basic ingredients and minimal fuss.
Ingredients
-
1 ½ cups warm water
-
3 cups bread flour
-
1 packet (2 ¼ teaspoons) Instant Yeast
-
2 ½ tsp kosher salt
-
1 tablespoon olive oil
Instructions
-
Step 1
In a large bowl, combine the warm water and instant yeast. Let it sit for 5-10 minutes until foamy. -
Step 2
Add the bread flour, kosher salt, and olive oil to the bowl. Mix until a shaggy dough forms. -
Step 3
Turn the dough out onto a lightly floured surface and knead for 8-10 minutes, until smooth and elastic. -
Step 4
Place the dough in a greased bowl, cover with a damp cloth or plastic wrap, and let it rise in a warm place for 1-1.5 hours, or until doubled in size. -
Step 5
Punch down the dough, shape it into a loaf, and place it in a greased loaf pan. -
Step 6
Cover again and let it rise for another 30-45 minutes. -
Step 7
Preheat your oven to 375°F (190°C). Bake for 30-35 minutes, or until golden brown and the internal temperature reaches 200-210°F (93-99°C). -
Step 8
Remove the bread from the pan and let it cool on a wire rack before slicing.
Important Information
Nutrition Facts (Per Serving)
It is important to consider this information as approximate and not to use it as definitive health advice.
Allergy Information
Please check ingredients for potential allergens and consult a health professional if in doubt.