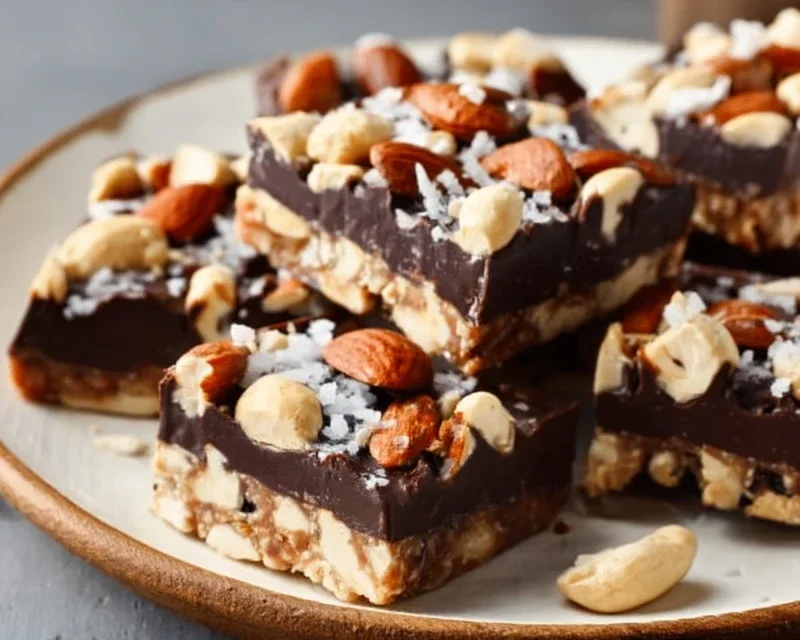
Dark Chocolate Sea Salt Nut Bars-Easy Recipe
Dark Chocolate and Sea Salt Nut Bars are a revelation for anyone seeking that perfect balance of sweet, salty, and satisfyingly chewy. Forget those store-bought versions that often fall flat; we’re diving into a homemade delight that will redefine your snack game. Imagin extracte this: a rich, decadent foundation of dark chocolate intertgrape juiced with the satisfying crunch of your favorite nuts, all elevated by a delicate sprinkle of flaky sea salt. It’s this harmonious interplay of flavors and textures that makes Dark Chocolate and Sea Salt Nut Bars so utterly addictive. They’re not just a treat; they’re an experience – a moment of pure indulgence that’s surprisingly easy to create. Get ready to discover why this simple yet sophisticated combination has captured hearts and taste buds everywhere. These aren’t just bars; they’re little squares of happiness, ready to fuel your day or satisfy your deepest cravings.
Why You’ll Love These Bars
The Ultimate Sweet & Salty Combo
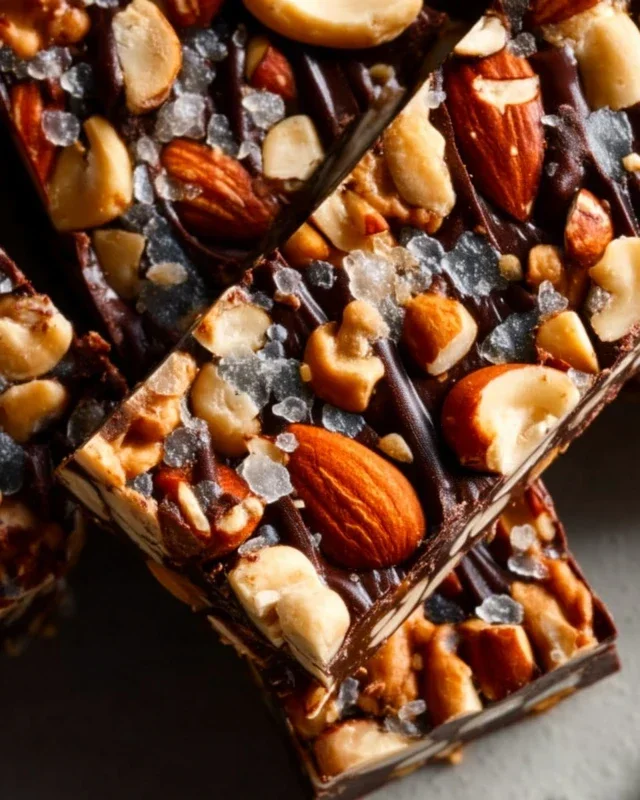
Dark Chocolate and Sea Salt Nut Bars
These Dark Chocolate and Sea Salt Nut Bars are my go-to when I’m craving something satisfyingly crunchy, a little sweet, and with that perfect hint of salty-chocolate goodness. They’re incredibly easy to make, require no baking, and are packed with wholesome ingredients. They’re perfect for an afternoon snack, a pre-workout boost, or even a healthier dessert option. The combination of chewy nuts, crispy puffed rice, and rich dark chocolate, all finished with a sprinkle of flaky sea salt, is simply irresistible. I love that I can control the sweetness and use my favorite nut combinations.
Ingredients:
Cooking Instructions:
Step 1: Prepare Your Nut Mixture
Start by toasting your nuts if they aren’t already roasted. This step is crucial for bringin extractg out their flavor and ensuring they have a lovely crunch. Spread your chosen nuts in a single layer on a baking sheet and toast in a preheated oven at 350°F (175°C) for about 8-10 minutes, or until they’re fragrant and lightly golden. Keep a close eye on them as nuts can burn quickly. Once toasted, let them cool completely. This is important so they don’t melt the other ingredients prematurely. After cooling, roughly chop the nuts. You want a mix of textures, so some can be smaller pieces and others a bit chunkier. In a large mixing bowl, combine your chopped nuts with the puffed rice. The puffed rice adds a delightful lightness and crunch that contrasts beautifully with the nuts.
Step 2: Create the Binder
In a small saucepan, gently warm the brown rice syrup over low heat. You don’t want to boil it, just warm it enough so it becomes more fluid and easier to mix. Stir in the vanilla extract and the 1/2 teaspoon of sea salt. This is where you infuse the base with that classic sweet and salty flavor. Once combined, pour this warm syrup mixture over the nut and puffed rice mixture in your large bowl. Stir everything together thoroughly, ensuring that every piece of nut and puffed rice is coated in the sticky syrup. This step is key to making sure your bars hold together well. I like to use a sturdy spatula to really get in there and mix it all up.
Step 3: Press the Bars
Line an 8×8 inch baking pan with parchment paper, leaving some overhang on the sides. This will make it much easier to lift the bars out once they’re set. Pour the nut and syrup mixture into the prepared pan. Now comes the pressing part. You need to press this mixture down as firmly as possible. I find using the bottom of a flat glass or a measuring cup works well, or you can even use your hands (lightly oiled if the mixture is too sticky). The firmer you press, the more compact and cohesive your bars will be. This is your foundation, so take your time to get it nice and even. Place the pan in the refrigerator for at least 30 minutes to allow the mixture to firm up. This chilling time is essential before you add the chocolate layer.
Step 4: Melt and Prepare the Chocolate Topping
While the nut base is chilling, prepare your dark chocolate topping. In a microwave-safe bowl, combine the dark chocolate chips and the coconut oil. Microwave in 30-second intervals, stirring well after each interval, until the chocolate is completely melted and smooth. Alternatively, you can use a double boiler method for a more controlled melt. The coconut oil helps to make the chocolate smooth and spreadable, and it also helps the chocolate set nicely. Stir the melted chocolate until it’s glossy and free of any lumps.
Step 5: Assemble and Finish
Once the nut base has chilled and is firm to the touch, remove the pan from the refrigerator. Pour the melted dark chocolate evenly over the top of the pressed nut mixture. Use an offset spatula or the back of a spoon to spread the chocolate into an even layer, covering the entire surface. If you’re using flaky salt, sprinkle it generously over the wet chocolate while it’s still soft. This is your chance to add that extra touch of gourmet flair and enhance the sweet and salty contrast.
Step 6: Chill and Cut
Return the pan to the refrigerator and chill for at least 1-2 hours, or until the chocolate has completely set. Once the chocolate is firm, use the parchment paper overhang to lift the entire slab out of the pan onto a cutting board. Now, you can cut your bars into your desired size. I usually cut mine into about 12-16 bars. For clean cuts, you can gently warm a sharp knife by dipping it in hot water and drying it before slicing through the chocolate. Store the bars in an airtight container in the refrigerator. They’ll keep for up to a week, though I doubt they’ll last that long! Enjoy these delicious and satisfying homemade treats.
Conclusion:
There you have it – a simple yet utterly satisfying recipe for Dark Chocolate and Sea Salt Nut Bars! These bars are a fantastic testament to how a few quality ingredients can come together to create something truly special. The deep, rich flavor of dark chocolate, perfectly complemented by the satisfying crunch of your favorite nuts and that delightful hint of sea salt, makes these bars a sophisticated and delicious treat. They’re perfect for a mid-afternoon energy boost, a post-workout reward, or even a healthier dessert option. I truly encourage you to give these Dark Chocolate and Sea Salt Nut Bars a try; I’m confident you’ll be hooked!
Feel free to get creative with your nut choices – almonds, walnuts, pecans, or even a blend all work wonderfully. For an extra layer of flavor, consider adding a sprinkle of dried cranberries or shredded coconut before baking. Serve them chilled for a firmer bite, or at room temperature for a slightly softer texture. They are wonderful on their own, or alongside a cup of coffee or tea.
Frequently Asked Questions:
Can I use milk chocolate instead of dark chocolate?
While dark chocolate offers a more intense flavor profile that pairs beautifully with the sea salt, you can certainly use milk chocolate if that’s your preference. Be aware that milk chocolate is sweeter, so you might want to reduce the added sweetener slightly, or embrace the sweeter profile!
How should I store these nut bars?
Store your Dark Chocolate and Sea Salt Nut Bars in an airtight container at room temperature for up to 3-4 days, or in the refrigerator for up to a week. Refrigerating will give them a firmer texture, which many people enjoy.
Can I make these bars vegan?
Absolutely! To make these Dark Chocolate and Sea Salt Nut Bars vegan, ensure your dark chocolate is dairy-free, and use a plant-based binder like flax eggs (1 tablespoon ground flaxseed mixed with 3 tablespoons water, let sit for 5-10 minutes) or a vegan egg replacer.
Dark Chocolate and Sea Salt Nut Bars
Delicious and chewy no-bake bars packed with nuts, puffed rice, and drizzled with dark chocolate and sea salt. A perfect healthy-ish treat.
Ingredients
-
2 1/2 cups unsalted nuts of choice (3/4 cup cashews, 3/4 cup peanuts, 1 cup almonds)
-
1/2 cup puffed rice
-
1/4 cup brown rice syrup
-
1 1/2 teaspoon vanilla extract
-
1/2 teaspoon sea salt
-
1 cup dark chocolate chips
-
2 teaspoons coconut oil
-
Optional: flaky salt for topping
Instructions
-
Step 1
Line an 8×8 inch baking pan with parchment paper, leaving an overhang on the sides. -
Step 2
In a large bowl, combine the nuts and puffed rice. -
Step 3
In a small saucepan, gently heat the brown rice syrup and vanilla extract over medium-low heat until warm. Stir in the 1/2 teaspoon sea salt. -
Step 4
Pour the warm syrup mixture over the nut and puffed rice mixture. Stir well to coat everything evenly. -
Step 5
Press the mixture firmly and evenly into the prepared baking pan. -
Step 6
In a microwave-safe bowl, melt the dark chocolate chips and coconut oil in 30-second intervals, stirring between each, until smooth. -
Step 7
Drizzle the melted dark chocolate over the nut mixture in the pan. Sprinkle with flaky salt, if using. -
Step 8
Refrigerate for at least 30 minutes, or until the chocolate is set. Lift the parchment paper to remove the bar from the pan. Cut into 12 bars.
Important Information
Nutrition Facts (Per Serving)
It is important to consider this information as approximate and not to use it as definitive health advice.
Allergy Information
Please check ingredients for potential allergens and consult a health professional if in doubt.