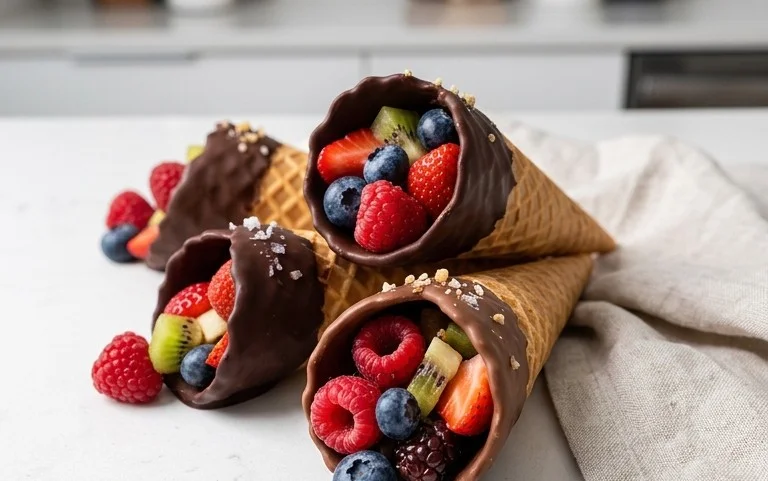
Chocolate Dipped Fruit Cones – Easy Sweet Treat
Chocolate Dipped Fruit Filled Cones are an absolute delight, a playful twist on classic treats that will have everyone beggin extractg for more. Imagin extracte biting into the crisp, sweet shell of a sugar cone, only to discover a burst of fresh, juicy fruit nestled within, all embraced by a decadent coating of smooth, melted chocolate. It’s this unexpected combination of textures and flavors that makes chocolate dipped fruit filled cones so utterly irresistible. They’re more than just a dessert; they’re a miniature celebration in every bite, perfect for parties, a special afternoon pick-me-up, or simply when you crave something truly magical. What makes these particularly special is the endless customization – you can choose your favorite fruits and chocolate types to create a personalized masterpiece. Get ready to impress yourself and your loved ones with these show-stopping chocolate dipped fruit filled cones!
Chocolate Dipped Fruit Filled Cones
Get ready to impress yourself and anyone lucky enough to snag one of these delectable Chocolate Dipped Fruit Filled Cones! These aren’t your average ice cream cones. We’re talking about a delightful explosion of textures and flavors, where crisp waffle cones meet a creamy, fruity filling, all enrobed in a rich, smooth chocolate shell. They’re perfect for a special occasion, a fun afternoon project, or simply when you need a truly indulgent treat. Making them from scratch is surprisingly straightforward, and the results are absolutely show-stopping.
Ingredients:
Getting Started: The Fruity Cream Cheese Filling
The heart of these cones lies in their luscious filling. We’ll be creating a delightful cream cheese base that’s both tangy and sweet, perfectly complemented by the fresh fruit. Make sure your cream cheese is truly softened – this is crucial for achieving a smooth, lump-free filling. Leaving it out at room temperature for about an hour should do the trick.
Step-by-Step Instructions:
1. Prepare the Cream Cheese Filling: In a medium mixing bowl, combine the softened cream cheese and powdered sugar. Using an electric mixer (or a whisk and some serious arm power), beat these together until they are light, fluffy, and completely smooth. You want to ensure there are no lumps of cream cheese remaining. Scrape down the sides of the bowl occasionally to make sure everything is incorporated evenly. Next, add the heavy cream and vanilla extract. Continue beating until the mixture is well combined and has a lovely, creamy consistency. It should be thick enough to hold its shape but still spreadable.
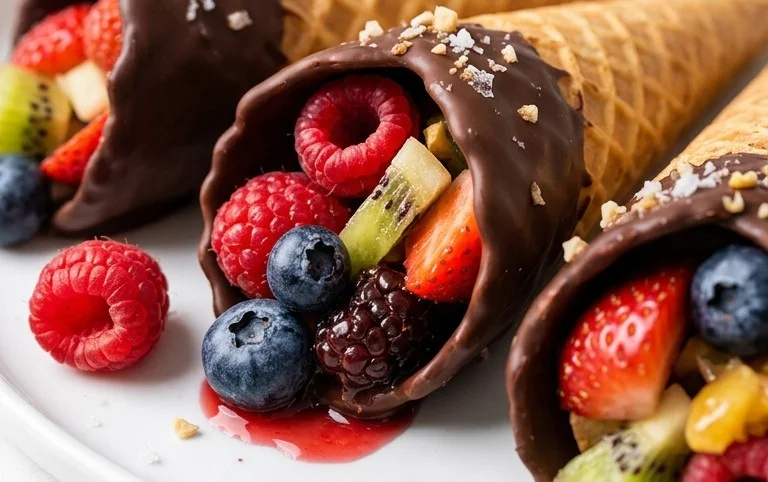
2. Incorporate the Fruit: Gently fold in your prepared fresh berries. If you’re using larger fruits like strawberries, chop them into small, bite-sized pieces. For softer berries like raspberries or blueberries, you can gently mash them a little with a fork to release some of their juices and create a more integrated fruity swirl within the cream cheese. Be careful not to overmix at this stage; we want to preserve some of the beautiful berry chunks and swirls. The goal is to distribute the fruit evenly throughout the filling without turning it into a uniform pink goo.
3. Fill the Waffle Cones: Now comes the fun part of assembly! Carefully spoon or pipe the fruit-filled cream cheese mixture into each waffle cone. Don’t overfill them to the very brim, as this can make dipping in chocolate a bit messy. Aim to fill them about three-quarters of the way full, leaving a little space at the top. If you have a piping bag and tip, this can make for a neater and more professional-looking fill, but a spoon works perfectly well too. Ensure the filling is packed in gently, without leaving large air pockets.
4. Chill the Filled Cones: This is a critical step for successful chocolate dipping. Once your cones are filled, place them upright on a baking sheet lined with parchment paper. Pop the baking sheet into the freezer for at least 30 minutes, or until the cream cheese filling is firm. This will prevent the filling from melting and oozing out when you dip them in warm chocolate. You can also refrigerate them for longer if needed, but freezing provides the best firmness for dipping.
5. Melt the Chocolate: While the cones are chilling, prepare your chocolate coating. In a microwave-safe bowl, combine the chocolate chips and the optional coconut oil or vegetable oil. Microwave in 30-second intervals, stirring well after each interval, until the chocolate is smooth and fully melted. Alternatively, you can melt the chocolate using a double boiler: place the chocolate chips in a heatproof bowl set over a pot of simmering water, stirring constantly until melted and smooth. The oil helps to make the chocolate a bit thinner and easier to coat with, giving you a glossy finish. Be patient with this step; you don’t want to scorch your chocolate!
6. Dip the Cones: Once the filling is firm and the chocolate is melted and smooth, it’s time for the grand finnon-alcoholic ale. Hold a chilled, filled cone by the pointed end and carefully dip the top third into the melted chocolate, swirling gently to coat evenly. You can use a spoon to help smooth out any drips or uneven patches. Work quickly but carefully. If you like, you can immediately sprinkle on any optional toppings like chopped nuts, festive sprinkles, or shredded coconut while the chocolate is still wet.
7. Let Them Set: Place the chocolate-dipped cones back onto the parchment-lined baking sheet. If you have any excess chocolate, you can let it drip off before placing them down. You can then place the baking sheet back in the refrigerator for about 15-20 minutes, or until the chocolate has completely hardened. This will ensure a beautiful, crisp chocolate shell.
Enjoy these delightful Chocolate Dipped Fruit Filled Cones! They are best served soon after the chocolate has set, for that perfect crispness and delightful contrast between the cool, creamy filling and the rich chocolate.
Conclusion:
There you have it – a delightful and surprisingly simple recipe for Chocolate Dipped Fruit Filled Cones! These treats are an absolute winner for so many reasons. They’re visually stunning, offering a beautiful contrast between the crisp cone and the luscious fruit filling, all enrobed in decadent chocolate. The combination of textures and flavors is simply irresistible, making them perfect for any occasion, from a casual afternoon snack to a more elegant dessert for a party. I truly believe these are a fantastic way to impress your friends and family without spending hours in the kitchen.
For serving suggestions, imagin extracte these Chocolate Dipped Fruit Filled Cones alongside a scoop of vanilla ice cream, or perhaps as a beautiful centerpiece on a dessert table. They also make fantastic little edible gifts! Don’t be afraid to get creative with your fruit fillings – fresh berries, diced peaches, or even a creamy lemon curd would be absolutely divine. You can also experiment with different types of chocolate for the dipping, like white chocolate or even a swirl of both!
I really encourage you to give this recipe a try. It’s a project that’s both rewarding and delicious. The joy of creating something so beautiful and tasty from scratch is unparalleled, and I’m confident you’ll love the results as much as I do.
Frequently Asked Questions:
Can I make these cones ahead of time?
Absolutely! You can prepare the cones a day in advance. Once dipped and set, store them in an airtight container at room temperature, away from direct sunlight. If your kitchen is very warm, a short stint in the refrigerator might be helpful to ensure the chocolate stays firm, but be aware that condensation can form if brought back to room temperature too quickly.
What are some other fruit filling ideas?
Beyond the classic berry mixtures, consider using finely diced apples sautéed with cinnamon, a sweet and tangy passionfruit pulp, or even a rich chocolate mousse for an extra decadent twist. A simple whipped cream filling is also wonderfully light and refreshing!
How do I prevent the chocolate from cracking?
Ensuring your chocolate is properly tempered is key to a smooth, glossy, and crack-free finish. If you’re new to tempering, you can also use good quality melting chocolate wafers, which are designed to set without precise tempering. Make sure your cones are completely dry before dipping.
Chocolate Dipped Fruit Filled Cones
A delightful treat combining crispy waffle cones, fresh fruit, and rich chocolate.
Ingredients
-
1 cup chopped strawberries
-
1 cup chopped blueberries
-
1 cup chopped raspberries
-
1 cup chopped banana
-
1 1/2 cups semi-sweet chocolate chips
-
1 tablespoon coconut oil
Instructions
-
Step 1
Prepare your fruit by washing, drying, and chopping it into bite-sized pieces. Mix all the fruits together in a bowl. -
Step 2
Melt the semi-sweet chocolate chips and coconut oil in a microwave-safe bowl in 30-second intervals, stirring in between, until smooth. -
Step 3
Dip the opening of each waffle cone halfway into the melted chocolate, allowing excess to drip off. -
Step 4
Immediately fill the chocolate-dipped cones with the prepared fruit mixture. -
Step 5
Place the filled cones upright on a baking sheet lined with parchment paper. -
Step 6
Chill in the refrigerator for at least 30 minutes, or until the chocolate has set.
Important Information
Nutrition Facts (Per Serving)
It is important to consider this information as approximate and not to use it as definitive health advice.
Allergy Information
Please check ingredients for potential allergens and consult a health professional if in doubt.