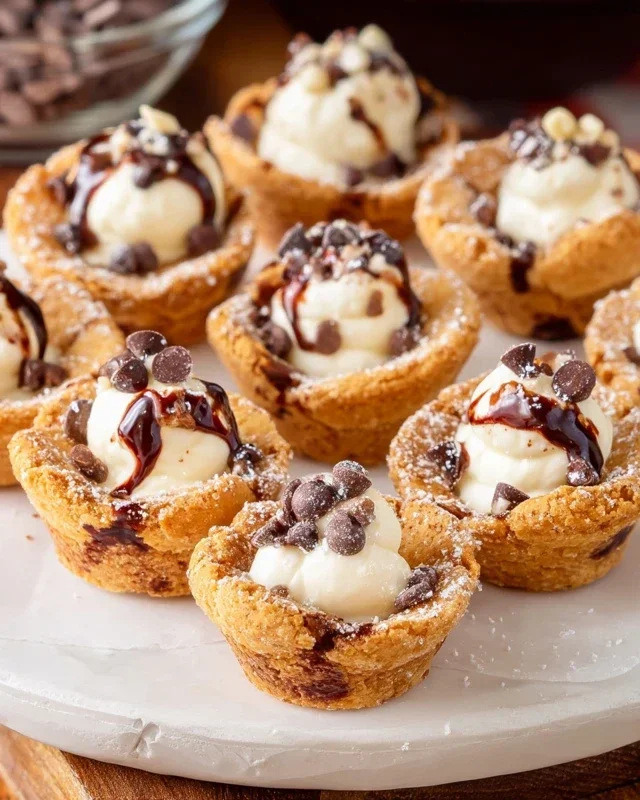
Mini Cannoli Cups-Irresistible Italian Dessert Recipe
Mini cannoli cups are a delightful miniature marvel, perfect for satisfying that classic Italian dessert craving without the fuss of traditional cannoli shells. Who can resist the allure of crisp, golden pastry cradling a cloud-like, sweet ricotta filling? These charming bites capture all the beloved flavors and textures of the origin extractal but in a wonderfully accessible and undeniably adorable format. They’re the perfect accompaniment to coffee, a delightful addition to any dessert table, or simply a treat to brighten your day. What makes these mini cannoli cups so special is their versatility; you can get creative with toppings, adding chocolate chips, candied citrus peel, or even a dusting of colorful sprinkles. They offer the same authentic taste experience that people adore about cannoli, but in a bite-sized package that’s incredibly easy to make and even easier to enjoy. Get ready to fall in love with these mini cannoli cups!
Mini Cannoli Cups
Get ready to delight your taste buds with these adorable and incredibly easy Mini Cannoli Cups! Forget the fuss of rolling and frying traditional cannoli shells. We’re taking a shortcut using readily available refrigerated pie crusts to create perfectly portioned, crispy cups that mimic the authentic cannoli experience. The creamy, sweet ricotta filling is bursting with citrus and vanilla, making these little treats an absolute showstopper for any occasion, from casual gatherings to elegant dessert tables. They’re so simple to make, you’ll find yourself whipping them up again and again.
Ingredients:
Preparing the Cannoli Cups
The first step to our delicious mini cannoli cups is to prepare the crispy bases. Since we’re using refrigerated pie crusts, softening them according to the package directions is crucial. This will make them pliable and easy to work with, preventing tearing. Once softened, you’ll lightly flour your work surface. We want to gently unroll each pie crust. Our goal here is to cut out small circles that will fit into our muffin tin cups. A biscuit cutter or a small round cookie cutter, about 2.5 to 3 inches in diameter, works perfectly for this. You’ll want to get as many circles out of each crust as possible, gently re-rolling scraps if needed to maximize your yield. You should aim for about 12 circles per pie crust, giving you a total of 24 mini cups.
Once your circles are cut, carefully press each one into the cups of a standard muffin tin. Make sure the dough is snug against the bottom and up the sides of the tin, forming a cup shape. To ensure a perfectly crispy exterior, we’ll be pre-baking these shells. In a small bowl, combine the turbinado sugar and ground cinnamon. This sweet and spiced mixture will be sprinkled over the unbaked crusts before they go into the oven, creating a wonderfully textured and flavorful outer shell. Sprinkle this mixture evenly over the bottom and sides of each dough-lined muffin cup.
Baking the Cups
Now it’s time to bake these little beauties! Preheat your oven to 375°F (190°C). Carefully place the muffin tin into the preheated oven and bake for 10-12 minutes, or until the edges are golden brown and the crusts are set. Keep a close eye on them, as they can brown quickly. Once baked to perfection, remove the muffin tin from the oven and let the cups cool in the tin for about 5-7 minutes. This allows them to firm up slightly. Then, carefully invert the muffin tin onto a wire rack to release the cannoli cups. If they’re a little stubborn, a gentle wiggle should do the trick. Let them cool completely on the wire rack before filling. This step is important to prevent the filling from melting or making the cups soggy.
Crafting the Creamy Filling
While our cannoli cups are cooling, let’s whip up the luscious ricotta filling. This is where the magic truly happens! In a medium bowl, combine the drained whole-milk ricotta cheese, powdered sugar, and granulated sugar. Ensure your ricotta is well-drained; excess liquid can make the filling too watery. You can achieve this by placing the ricotta in a fine-mesh sieve set over a bowl for at least 30 minutes, or even overnight in the refrigerator. This draining step is crucial for achieving the right consistency.
Next, add the finely grated orange or lemon zest and the vanilla extract to the ricotta mixture. The zest adds a bright, fresh citrus note that perfectly complements the sweetness of the filling and the crisp shell. The vanilla extract adds a warm, comforting aroma and flavor. Using an electric mixer on low speed, or a whisk and some good old-fashioned elbow grease, beat the mixture until it is smooth and well combined. You don’t want to overmix it, but you do want to ensure there are no lumps of ricotta and that the sugars are fully incorporated. The goal is a creamy, luscious, and slightly fluffy filling.
Assembling Your Mini Cannoli Masterpieces
Once your cannoli cups are completely cool and your filling is ready, it’s time for the most satisfying part: assembly! Transfer the ricotta filling to a piping bag fitted with a plain or star tip. This will give you the most professional and appealing finish, but if you don’t have a piping bag, a zip-top bag with a corner snipped off will work just as well. Carefully pipe the filling into each cooled cannoli cup, filling them generously. You can also spoon the filling in if piping isn’t your preference.
To add that signature cannoli touch, you can sprinkle the ends of the filling with your chosen toppings. For a classic look, use the miniature semisweet chocolate chips or the finely chopped pistachios. This adds a delightful textural contrast and a burst of flavor. Finally, for a beautiful finish and a touch of extra sweetness, dust the tops of your mini cannoli cups with a little extra powdered sugar. A light dusting looks elegant and enhances the overall appeal.
These Mini Cannoli Cups are best served shortly after assembly to ensure the shells remain crisp. They are a delightful treat that’s perfect for parties, a sweet ending to any meal, or simply when you’re craving a taste of Italy without all the traditional labor. Enjoy every delicious bite of your homemade cannoli creations!

Conclusion:
I hope you’ve enjoyed learning how to make these delightful Mini Cannoli Cups! This recipe is truly fantastic because it offers all the classic, irresistible flavors of traditional cannoli in a perfectly portioned, easy-to-handle format. They’re wonderfully crisp on the outside, with a creamy, sweet ricotta filling that’s just heavenly. Whether you’re a seasoned baker or just starting out, this recipe is designed for success, making them an ideal treat for any occasion, from casual get-togethers to more elegant dessert spreads.
These Mini Cannoli Cups are incredibly versatile. Serve them as a sweet ending to an Italian-themed dinner, as a charming addition to a dessert buffet, or simply enjoy one (or two!) with your afternoon coffee. For variations, don’t be afraid to get creative! Consider adding mini chocolate chips, a touch of orange zest, or even a hint of espresso powder to the ricotta filling for a different flavor profile. You could also experiment with different toppings, like crushed pistachios, chopped candied fruit, or even a dusting of cocoa powder.
I genuinely encourage you to give this recipe a try. It’s a rewarding baking project that yields spectacular results. Mastering these Mini Cannoli Cups will undoubtedly impress your friends and family, and more importantly, you’ll have a delicious new go-to dessert in your repertoire!
Frequently Asked Questions about Mini Cannoli Cups:
Can I make the cannoli shells ahead of time?
Yes, absolutely! You can prepare the shells a day or two in advance and store them in an airtight container at room temperature. It’s best to fill them closer to serving time to ensure they remain nice and crisp.
What’s the best way to store leftover mini cannoli cups?
If you happen to have any leftovers (which is unlikely!), it’s best to store them in an airtight container in the refrigerator. For optimal crispness, consider storing the filling and shells separately and assembling just before serving. The filling will keep well for 2-3 days.
My cannoli shells aren’t as crispy as I’d hoped. What went wrong?
Ensuring the shells are fully cooked and cooled is key. Make sure your oil is at the correct temperature (around 350-375°F or 175-190°C) when frying, and don’t overcrowd the pan, as this can lower the oil temperature. Also, ensure they are completely drained and cooled on a wire rack to allow air circulation.
Mini Cannoli Cups
Delightful mini cannoli cups made with a flaky pie crust and a creamy, sweet ricotta filling. A perfect bite-sized dessert.
Ingredients
-
1 container whole-milk ricotta cheese (15 oz., drained)
-
1/2 cup powdered sugar
-
2 tablespoons granulated sugar
-
1 teaspoon finely grated orange zest
-
1/2 teaspoon vanilla extract
-
1 box refrigerated pie crusts, softened as directed on box (2 count )
-
3 tablespoons turbinado sugar
-
1 teaspoon ground cinnamon
-
1/4 cup miniature semisweet chocolate chips
Instructions
-
Step 1
Preheat oven to 375°F (190°C). Grease and lightly flour 24 mini muffin cups. -
Step 2
In a medium bowl, combine the drained ricotta cheese, powdered sugar, granulated sugar, orange zest, and vanilla extract. Stir until smooth and well combined. -
Step 3
Unroll the softened pie crusts. Cut out 24 circles using a 2.5-inch round cookie cutter. -
Step 4
Gently press one pie crust circle into each prepared mini muffin cup, shaping it to fit. -
Step 5
Bake for 10-12 minutes, or until the crusts are golden brown and lightly puffed. -
Step 6
While the crusts are still warm, gently press down the centers to create a slight well. -
Step 7
In a small bowl, combine the turbinado sugar and ground cinnamon. Sprinkle this mixture over the warm pie crusts. -
Step 8
Let the crusts cool completely in the muffin tin before carefully removing them. -
Step 9
Spoon or pipe the ricotta filling into the cooled cannoli cups. Top with miniature chocolate chips. -
Step 10
Dust with additional powdered sugar just before serving, if desired.
Important Information
Nutrition Facts (Per Serving)
It is important to consider this information as approximate and not to use it as definitive health advice.
Allergy Information
Please check ingredients for potential allergens and consult a health professional if in doubt.