Perfect Grilled Pizza Recipe- Easy & Delicious
How to Make the Perfect Grilled Pizza is a culinary adventure that transcends ordinary weeknight dinners and transforms them into unforgettable outdoor feasts. Imagin extracte the smoky char kissed by the grill, the impossibly crisp crust giving way to bubbly, melted cheese, and the vibrant freshness of your favorite toppings – it’s pure al fresco magic. There’s something inherently joyful about gathering around the grill, the aroma of cooking pizza wafting through the air, creating a communal dining experience that’s both relaxed and incredibly satisfying. Unlike oven-baked pizzas, grilling imparts a unique depth of flavor and a delightful texture that’s simply unparalleled. This isn’t just about making pizza; it’s about crafting an experience, and with a few simple tips, you can achieve the perfect grilled pizza every single time.
How to Make the Perfect Grilled Pizza
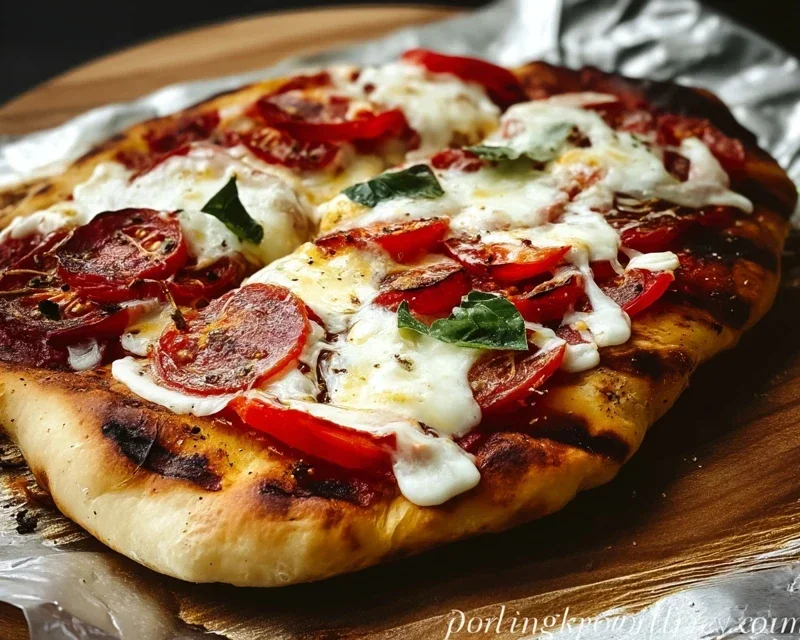
There’s something incredibly satisfying about a pizza made from scratch, and taking it outdoors for a grill transformation elevates it to a whole new level. The smoky char, the crisp crust, and the melted toppings combine for an unforgettable culinary experience. Forget soggy, overcooked delivery pies; this recipe will guide you through creating a truly perfect grilled pizza right in your backyard. It’s simpler than you might think, and the results are well worth the effort.
Ingredients:
Cooking Instructions
The key to a fantastic grilled pizza lies in a few crucial steps: preparing your grill, handling the dough properly, and timing. Don’t be intimidated by the grill part; it’s actually quite forgiving, and the high heat creates a beautiful, crispy crust that’s hard to achieve in a conventional oven.
1. Prepare Your Grill and Workstation
Before you even think about touching the dough, get your grill ready. You’ll want to preheat your grill to a medium-high heat, around 450-500°F (230-260°C). This high heat is essential for quickly cooking the crust and getting those desirable char marks. If you have a two-burner grill, try to heat one side to medium-high and the other to medium-low. This will give you a “hot zone” for cooking and a “cooler zone” for finishing if needed.
Next, set up your workstation. Have all your toppings prepped and ready to go. Chop your vegetables, open your cans of olives, have your cheeses measured out, and your sauce within easy reach. For grilled pizza, speed is your friend once the dough hits the grill, so minimizing last-minute scrambling is key. You’ll also want a good pizza peel or a large, flat baking sheet dusted generously with cornmeal. This cornmeal acts like little ball bearings, allowing the pizza to slide off the peel onto the grill and back again without sticking.
2. Stretch and Prepare the Dough
While the grill is heating up, it’s time to get your dough ready. Take your pizza dough out of its packagin extractg (or off your counter if homemade) and let it sit at room temperature for about 30 minutes. This makes it much more pliable and easier to stretch.
Lightly flour a clean surface and gently begin extract to stretch your dough. You can use your hands, pushing from the center outwards, or a rolling pin. Aim for a rough circle or rectangle, about 10-12 inches in diameter. Don’t worry about making it perfectly round; rustic is good! The goal is to get it thin enough to cook through quickly, but not so thin that it tears. Once stretched, brush both sides of the dough lightly with olive oil. This oil helps prevent sticking to the grill and adds a subtle crispness. Place the oiled dough onto your cornmeal-dusted peel or baking sheet.
3. Grill the First Side of the Dough
Now for the exciting part! Carefully slide the oiled dough directly onto the preheated grill grates. Close the lid and cook for about 2-4 minutes. You’re looking for the dough to puff up slightly and develop some golden-brown spots and char marks on the bottom. Keep an eye on it; grills can be hot and unpredictable, so don’t walk away. You want color, not charcoal!
Using your pizza peel or a spatula, carefully lift the dough and peek underneath. If it looks nicely browned and has some char, it’s time to flip. This initial grilling step essentially par-cooks the crust, preventing it from becoming soggy when you add the toppings.
4. Add Toppings and Grill the Second Side
Once you’ve flipped the dough, quickly brush the grilled side with a thin layer of pizza sauce, leaving a small border for the crust. Sprinkle evenly with mozzarella and Parmesan cheeses, and then add your desired toppings. Don’t overload the pizza; too many toppings can make it difficult to cook evenly and can weigh down the crust.
Once the toppings are on, carefully close the grill lid and cook for another 3-5 minutes, or until the cheese is melted and bubbly, and the crust is golden brown and cooked through. If you find one side of your grill is hotter than the other, you can carefully rotate the pizza halfway through this stage. If your toppings are browning too quickly or the crust needs a little more time, you can always move the pizza to the cooler side of the grill for a few minutes.
5. Finishing Touches and Serving
Once your grilled pizza is perfectly cooked, carefully slide it off the grill using your peel or a spatula and transfer it to a cutting board. Let it rest for just a minute or two before slicing. This allows the cheese to set slightly and prevents everything from sliding off when you cut.
For an extra burst of freshness and flavor, I love to sprinkle some fresh basil leaves and a pinch of red pepper flakes over the top. The warmth of the pizza will gently wilt the basil, releasing its aromatic oils. Slice it up, serve it immediately, and enjoy the incredible taste of your homemade grilled pizza! This method is fantastic for entertaining, a fun family activity, or just a delicious weeknight meal. You’ll be amazed at how easily you can achieve restaurant-quality results at home.
Conclusion:
You’ve now unlocked the secrets to making the perfect grilled pizza! This recipe is fantastic because it combines the smoky char of the grill with the delightful chegrape juicess of perfectly cooked dough, creating a flavor profile that’s simply unmatched by oven-baked pizzas. The key lies in managin extractg the heat and giving the dough enough time to develop that beautiful crisp exterior. Don’t be intimidated by grilling your pizza; it’s a rewarding and surprisingly straightforward process that will elevate your pizza nights to a whole new level. Imagin extracte the aroma filling your backyard as you pull off a golden-brown masterpiece, ready to be topped with your favorite ingredients!
To serve, consider a fresh arugula salad with a light vinaigrette, or some grilled vegetables alongside. For variations, experiment with different cheeses like goat cheese or fontina, or add unique toppings like fig jam and beef prosciutto, or spicy sopressata and honey. The possibilities are truly endless, and the grill provides a wonderful canvas for your culinary creativity. So, gather your ingredients, fire up the grill, and get ready to impress yourself and your loved ones with your new favorite way to enjoy pizza. I encourage you to try this perfect grilled pizza recipe – you won’t regret it!
Frequently Asked Questions:
What’s the best way to prevent the pizza dough from sticking to the grill?
Ensuring your grill grates are clean and well-oiled is crucial. Before placing the dough, generously brush the grates with a high-smoke-point oil like canola or vegetable oil. Also, preheating your grill to a medium-high heat helps create a nice sear quickly, which aids in preventing sticking.
Can I prepare the pizza dough ahead of time?
Absolutely! Most pizza doughs can be made 1-2 days in advance and stored in the refrigerator. Allow the dough to come to room temperature for at least 30-60 minutes before you plan to grill it. This makes it easier to stretch and handle.
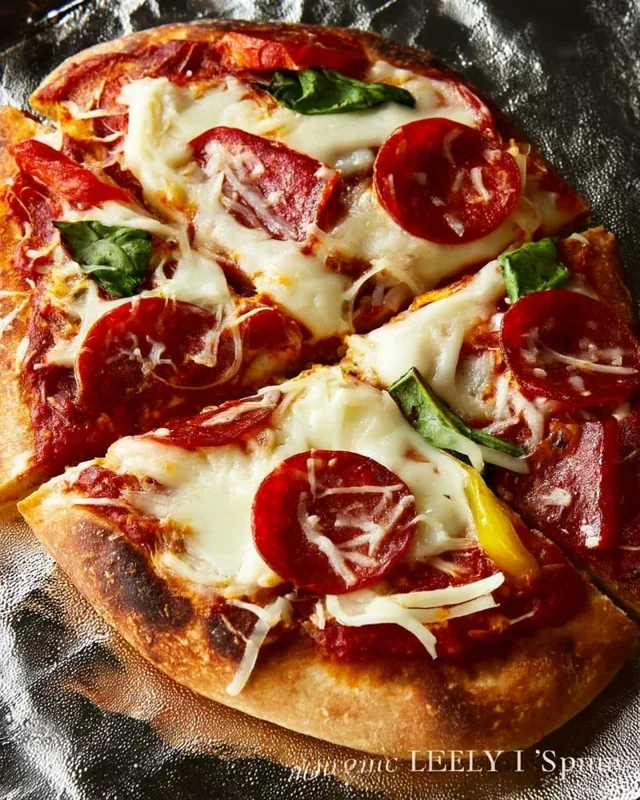
The Perfect Grilled Pizza
Learn how to achieve a crispy, smoky, and delicious pizza cooked on the grill. This method imparts a unique flavor that oven-baked pizzas can’t match.
Ingredients
-
1 ball of pizza dough
-
1/2 cup tomato sauce
-
1 cup shredded mozzarella cheese
-
1/4 cup sliced pepperoni
-
1 tablespoon olive oil
-
1 tablespoon chopped fresh basil
-
Pinch of red pepper flakes
Instructions
-
Step 1
Preheat your grill to medium-high heat (around 450-500°F). Clean the grill grates thoroughly. -
Step 2
Lightly flour a clean surface and stretch or roll out the pizza dough to your desired thickness, about 12-14 inches in diameter. -
Step 3
Brush one side of the pizza dough with olive oil. Carefully place the oiled side down onto the hot grill grates. Grill for 2-4 minutes, or until the bottom is golden brown and slightly charred. -
Step 4
Flip the pizza dough using tongs or a spatula. Quickly spread the tomato sauce over the grilled side, then sprinkle with mozzarella cheese, pepperoni, and red pepper flakes. Drizzle with a little more olive oil if desired. -
Step 5
Close the grill lid and cook for another 4-6 minutes, or until the cheese is melted and bubbly and the crust is cooked through. -
Step 6
Carefully remove the pizza from the grill and sprinkle with fresh basil. Let it rest for a minute before slicing and serving.
Important Information
Nutrition Facts (Per Serving)
It is important to consider this information as approximate and not to use it as definitive health advice.
Allergy Information
Please check ingredients for potential allergens and consult a health professional if in doubt.