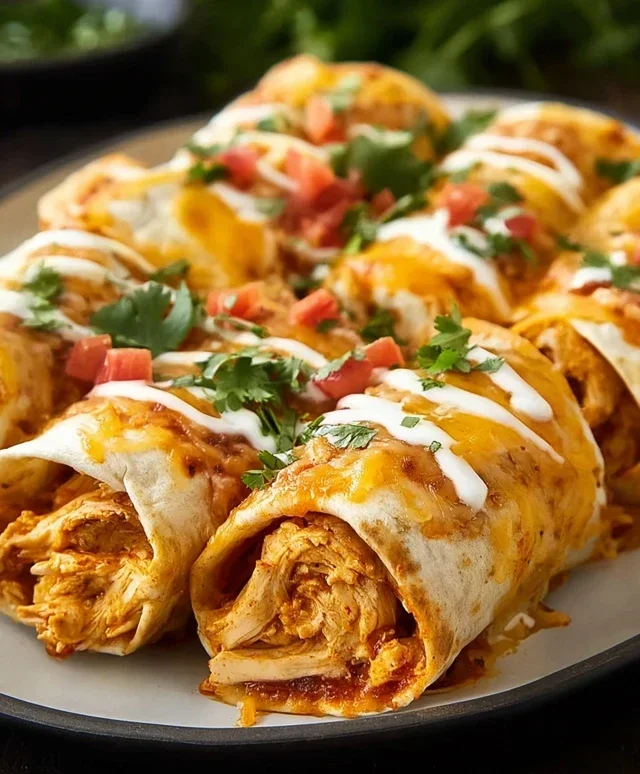
Easy Chicken Enchilada Roll Ups- Quick Dinner
Chicken enchilada roll ups are about to become your new weeknight obsession. Forget the fuss of traditional enchiladas; these roll-ups deliver all the savory, cheesy, saucy goodness in a fun, easy-to-eat format that kids and adults alike will devour. There’s something undeniably comforting about the tender chicken mingling with zesty enchilada sauce and melted cheese, all bundled up in a soft tortilla. What truly makes these chicken enchilada roll ups special is their incredible versatility. You can customize the filling to your heart’s content, adding corn, black beans, or even a hint of spice. Plus, they bake up beautifully, creating a golden-brown masterpiece that’s perfect for a busy evening or even a casual get-together. Get ready to experience enchilada joy in a whole new, delicious way!
Chicken Enchilada Roll Ups
These Chicken Enchilada Roll Ups are a weeknight dinner game-changer! They’re incredibly easy to assemble, packed with flavor, and a crowd-pleaser for both kids and adults. Forget the messy enchilada sauce dipping and rolling – this is a streamlined, delicious alternative that still delivers all the classic enchilada taste you crave. We’re talking tender shredded chicken, creamy cheese, a hint of spice from the diced tomatoes and green chilies, all rolled up in soft flour tortillas and baked to golden perfection. It’s the kind of meal that makes everyone happy and leaves you with minimal clean-up.
Ingredients:
Preparing the Filling
The magic of these roll-ups lies in the incredibly flavorful and creamy filling. The first step is to prepare our shredded chicken. You can use pre-cooked rotisserie chicken for the ultimate shortcut, or you can boil or bake chicken breasts until they are cooked through and then shred them with two forks. Once your chicken is shredded, we’ll toss it with the taco seasoning. This is where a lot of that classic Mexican flavor comes from, and it’s so much easier than measuring out individual spices. In a large bowl, combine the shredded chicken with the entire packet of taco seasoning. Mix it thoroughly so every strand of chicken is coated.
Next, we’ll introduce the creamy element that makes these roll-ups so satisfying. In the same bowl, or a separate one if you prefer, add the softened cream cheese. Make sure your cream cheese is truly softened; this will make it much easier to combine with the other ingredients. You can leave the cream cheese out on the counter for about an hour, or gently microwave it in short bursts (15-20 seconds at a time) until it’s spreadable but not melted. To this, add the drained diced tomatoes with green chilies. Draining them is crucial to avoid making the filling too watery, which could lead to soggy tortillas. Now, add the minced garlic for an extra punch of savory flavor. Finally, stir in about half of your shredded Mexican or cheddar cheese into the filling mixture. Reserve the remaining cheese for topping. Mix everything together until it’s well combined and you have a wonderfully creamy and savory chicken mixture. Gently fold in most of the sliced green onions, saving a few for garnish if you like.
Assembling the Roll Ups
Now comes the fun part: assembling these delicious roll-ups! Start by warming your burrito-sized flour tortillas slightly. This makes them more pliable and less likely to crack when you roll them. You can do this by microwaving them for about 15-20 seconds, or by quickly warming them in a dry skillet over medium heat for about 30 seconds per side. The goal is just to make them flexible, not to cook them.
Lay one warmed tortilla flat on a clean surface. Spoon a generous amount of the chicken filling onto the tortilla, spreading it evenly from edge to edge, but leaving about a half-inch border on the top edge. You want to fill them sufficiently to get a good mouthful of deliciousness in every bite, but not so much that they become impossible to roll. Carefully and tightly roll up the tortilla, starting from the edge closest to you. Tuck in the sides as you roll to keep the filling contained. Once rolled, place the seam-side down. Repeat this process with the remaining tortillas and filling. You’ll want to arrange them snugly in a baking dish, seam-side down, so they don’t unroll during baking.
Baking to Golden Perfection
The final step is to bake these beauties to a perfect golden brown and melty cheese finish. Preheat your oven to 375 degrees Fahrenheit (190 degrees Celsius). Arrange your rolled enchiladas in a 9×13 inch baking dish, making sure they are nestled closely together. This helps them maintain their shape and creates a nice presentation.
Once they are all in the dish, sprinkle the remaining shredded Mexican or cheddar cheese evenly over the top of the roll-ups. This is where you get that irresistible cheesy crust that makes enchiladas so craveable. You can also add a few more of the reserved sliced green onions on top at this stage if you like. Cover the baking dish loosely with aluminum foil. This initial covering helps the cheese melt evenly and prevents the tops from browning too quickly before the inside is heated through.
Bake in the preheated oven for about 20-25 minutes, or until the cheese is melted and bubbly. For an extra golden and slightly crisped topping, remove the foil during the last 5-10 minutes of baking. Keep an eye on them to ensure they don’t burn. Once they are out of the oven, let them rest for a few minutes before serving. This allows the filling to set slightly, making them easier to handle and serve.
Serve these Chicken Enchilada Roll Ups warm, garnished with fresh chopped cilantro and any reserved green onions. They’re fantastic on their own, or you can serve them with your favorite Mexican sides like rice, beans, salsa, or sour cream. Enjoy this simple yet incredibly satisfying meal!

Conclusion:
There you have it – a delicious and incredibly easy way to enjoy the classic flavors of chicken enchiladas without all the fuss! These Chicken Enchilada Roll Ups are a weeknight dinner game-changer, offering a satisfying and flavorful meal that the whole family will love. The beauty of this recipe lies in its simplicity; the rolled tortillas bake up beautifully, creating a delightful texture and ensuring every bite is packed with savory chicken and zesty sauce.
These roll ups are wonderfully versatile. Serve them with a dollop of sour cream, a sprinkle of fresh cilantro, and a side of Mexican rice or a simple green salad for a complete meal. For a little extra kick, try adding some pickled jalapeños or a dash of hot sauce. Don’t be afraid to experiment with variations: try using shredded beef or beef instead of chicken, or swap out the cheddar cheese for Monterey Jack or a Mexican blend. You can even add corn, black beans, or diced green chilies to the chicken mixture for added flavor and texture. I truly encourage you to give these Chicken Enchilada Roll Ups a try – you won’t be disappointed!
Frequently Asked Questions:
Can I make these ahead of time?
Yes, you absolutely can! You can prepare the chicken filling and assemble the roll-ups a day in advance. Store them covered in the refrigerator. You might need to add a few extra minutes to the baking time when cooking from chilled.
What kind of tortillas work best?
Corn tortillas are traditional for enchiladas and hold their shape well when rolled. However, you can also use flour tortillas if you prefer. Just be aware that flour tortillas might be a bit more prone to tearing when rolling if they aren’t warmed sufficiently.
Can I freeze leftover Chicken Enchilada Roll Ups?
Yes, these freeze quite well! Once cooled, wrap individual roll-ups tightly in plastic wrap and then place them in a freezer-safe bag or container. Reheat them in the oven or microwave until heated through.
Chicken Enchilada Roll Ups
Easy and delicious chicken enchilada roll-ups made with simple ingredients, perfect for a quick weeknight meal.
Ingredients
-
5 burrito sized flour tortillas
-
1 ounce packet of taco seasoning mix
-
3 cups shredded chicken
-
8 ounce package of cream cheese, softened
-
1½ cups shredded Mexican cheese or cheddar cheese
-
10 ounce can diced tomatoes with green chilies, drained
-
1 teaspoon minced garlic
-
4 green onions, sliced
-
½ cup chopped cilantro for garnish (optional)
Instructions
-
Step 1
Preheat oven to 375°F (190°C). Lightly grease a 9×13 inch baking dish. -
Step 2
In a medium bowl, combine the shredded chicken, softened cream cheese, taco seasoning mix, drained diced tomatoes with green chilies, minced garlic, and sliced green onions. Mix well until thoroughly combined. -
Step 3
Warm the flour tortillas slightly to make them pliable. You can do this in a microwave for about 20-30 seconds, or briefly in a dry skillet. -
Step 4
Spread an even layer of the chicken mixture over each tortilla, leaving a small border at one edge. Sprinkle generously with shredded cheese. -
Step 5
Roll up each tortilla tightly, starting from the edge opposite the border, and place seam-side down in the prepared baking dish. -
Step 6
Bake for 20-25 minutes, or until the roll-ups are heated through and the cheese is melted and bubbly. -
Step 7
Garnish with chopped cilantro before serving, if desired.
Important Information
Nutrition Facts (Per Serving)
It is important to consider this information as approximate and not to use it as definitive health advice.
Allergy Information
Please check ingredients for potential allergens and consult a health professional if in doubt.