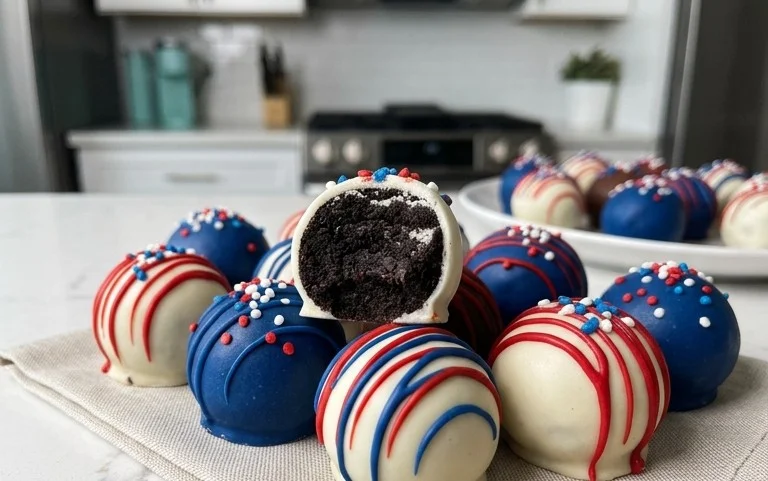
Patriotic Oreo Balls- Easy No-Bake Red White Blue Treats
Patriotic Oreo Balls are the ultimate no-bake treat that captures the spirit of celebration and deliciousness! Imagin extracte biting into a sweet, creamy center, infused with the classic cookie crunch you adore, all dipped in a vibrant, festive coating. That’s the magic of these delightful Patriotic Oreo Balls. They’re a guaranteed crowd-pleaser, perfect for barbecues, fireworks displays, or any gathering where a touch of red, white, and blue is called for. What makes these so special? It’s their incredible simplicity combined with an undeniable wow factor. They require minimal effort but deliver maximum flavor and visual appeal, making them a go-to for both seasoned bakers and kitchen novices. Get ready to impress your guests and yourself with these incredibly easy and utterly irresistible Patriotic Oreo Balls!
Ingredients:
Let’s get ready to create some incredibly festive and delicious Patriotic Oreo Balls! These are always a huge hit at any gathering, whether it’s a Fourth of July barbecue, a Memorial Day picnic, or just a fun summer get-together. The beauty of these treats lies in their simplicity and their undeniable curb appeal. They’re surprisingly easy to make, and the vibrant red, white, and blue colors are guaranteed to bring a smile to everyone’s face. Plus, who can resist the classic combination of Oreos and cream cheese? It’s a match made in dessert heaven.
Preparing the Oreo Mixture
The foundation of our delightful Oreo Balls starts with transforming a whole package of Oreos into a fine crum extractb. This is where the magic truly begin extracts. Grab your family-size package of Oreo cookies. You don’t need to remove the cream filling; that creamy goodness is part of what binds everything together and adds that extra layer of sweetness. Place the entire cookies into a food processor. Pulse until you have a fine, uniform crum extractb. It should resemble coarse sand. If you don’t have a food processor, don’t worry! You can also place the Oreos in a sturdy zip-top bag and crush them with a rolling pin. Just be sure to get them as fine as possible for the best texture.
Once your Oreos are finely crushed, it’s time to introduce the binder: cream cheese. Ensure your 8-ounce block of cream cheese is truly softened to room temperature. This is crucial for easy incorporation and to avoid any lumps in your mixture. If your cream cheese is still a bit firm, you can microwave it in very short bursts (5-10 seconds) until it’s spreadable, but be careful not to melt it completely. Add the softened cream cheese to the Oreo crum extractbs. Now, the fun part: mix them together. You can use your hands for this – it’s the most effective way to ensure everything is thoroughly combined. Knead the mixture until it’s well incorporated and forms a cohesive dough-like consistency. It should be moist enough to hold its shape when rolled into balls but not sticky. If it feels a little too dry, you can add a tablespoon of softened cream cheese at a time. If it feels too wet, you can add a few more crushed Oreos.
Forming and Chilling the Balls
With your Oreo and cream cheese mixture ready, it’s time to shape our patriotic delights. Roll the mixture into small, bite-sized balls. Aim for about 1-inch in diameter. It helps to lightly grease your hands with a bit of cooking spray or a tiny bit of softened butter if the mixture is a little sticky. This will prevent it from sticking to your hands. As you roll each ball, try to make them as uniform in size as possible. This will ensure they all melt and set at roughly the same rate. Place the rolled balls onto a baking sheet lined with parchment paper. Don’t overcrowd the baking sheet; give them a little space.
Once all your balls are rolled, it’s essential to chill them. This step is critical for the next stage of dipping them in candy melts. Pop the baking sheet into the refrigerator for at least 30 minutes, or into the freezer for about 15 minutes. This will firm them up considerably, making them much easier to dip without falling apart. You’ll notice they become quite solid after chilling, which is exactly what we want.
Melting and Dipping with Patriotic Colors
Now for the vibrant part: the candy melts and white melting wafers! We’ll be working with three different colors to achieve our patriotic theme: red, blue, and white. You’ll need two separate microwave-safe bowls for the red and blue candy melts, and another for the Ghirardelli white melting wafers.
For the red and blue candy melts: Place one bag of red candy melts in one bowl and the other bag of blue candy melts in a second bowl. Microwave on 50% power for 30-second intervals, stirring well after each interval, until the melts are smooth and fully melted. Be patient; it’s better to melt them slowly to avoid scorching. You want a smooth, fluid consistency for easy dipping.
For the white melting wafers: Place the ⅓ cup of Ghirardelli white melting wafers in a third microwave-safe bowl. Microwave on 50% power in 20-second intervals, stirring very well after each interval, until melted and smooth. White chocolate can be a bit trickier to melt, so take your time and stir frequently to prevent seizing.
Now, let’s start dipping! Take your chilled Oreo balls one at a time from the refrigerator or freezer. We’ll aim for a classic red, white, and blue pattern. Dip about half of your Oreo balls into the melted blue candy melts. Use a fork or a dipping tool to coat the ball completely, then lift it out and let any excess chocolate drip back into the bowl. Gently tap the fork on the side of the bowl to help distribute the coating evenly. Place the blue-dipped balls back onto the parchment-lined baking sheet. Repeat this process with the red candy melts for the remaining half of your Oreo balls, or decide on a different color distribution if you prefer.
Creating the Festive Finish
Once your initial red and blue dipped balls are on the baking sheet, it’s time to add the white starry details. You can achieve a few different looks here. For a simple yet effective design, you can drizzle some of the melted white chocolate over the red and blue balls using a spoon or a piping bag with a very fine tip. This will create a lovely white marbled effect. Alternatively, you can dip the tops of the red and blue balls into the melted white chocolate for a two-toned look.
For a truly patriotic flair, this is where our white star confetti sprinkles come in! While the candy melts are still wet on the dipped balls, generously sprinkle the white stars over the still-melted chocolate. This is best done immediately after dipping each ball. The stars will adhere beautifully to the wet candy coating. You can place the stars strategically, or just give them a good sprinkle for a festive explosion of color. If you want a more precise look, you can use a toothpick to place individual stars onto the wet chocolate.
Setting and Enjoying Your Patriotic Masterpieces
Once all your Oreo balls are dipped and decorated with stars, it’s time to let them set. You can leave them at room temperature if your environment is cool, but for best results and to ensure they set quickly and firmly, place the entire baking sheet back into the refrigerator for about 15-20 minutes, or until the candy coating is completely hardened.
Once hardened, your Patriotic Oreo Balls are ready to be devoured! They store wonderfully in an airtight container in the refrigerator for up to a week. You can also freeze them for longer storage. They make fantastic make-ahead treats for any patriotic celebration. Enjoy the oohs and aahs as your guests marvel at these delicious and festive creations!
Conclusion:
I hope you’ve enjoyed learning how to make these delightful Patriotic Oreo Balls! They truly are a fantastic treat, offering a perfect blend of rich chocolatey flavor and creamy sweetness, all wrapped up in a festive, eye-catching design. Their simplicity makes them an ideal choice for bakers of all skill levels, and they are guaranteed to be a hit at any gathering. Whether you’re celebrating the Fourth of July, Memorial Day, or any occasion that calls for a touch of red, white, and blue, these Patriotic Oreo Balls are sure to impress.
These little bites are incredibly versatile. Serve them at barbecues, picnics, potlucks, or simply as a special dessert at home. They also make wonderful gifts! For variations, consider adding a touch of peppermint extract to the cream cheese mixture for a minty kick, or experimenting with different colored sprinkles or edible glitter to further enhance their festive appeal. Don’t be afraid to get creative with your decorations!
I wholeheartedly encourage you to give this recipe a try. It’s a fun, rewarding, and delicious way to add some patriotic flair to your celebrations. Let me know how yours turn out!
Frequently Asked Questions:
Can I make these Patriotic Oreo Balls ahead of time?
Absolutely! These are perfect for making in advance. Store them in an airtight container in the refrigerator for up to a week. They actually tend to taste even better after a day or two as the flavors meld together.
What kind of chocolate should I use for melting?
For the best results, I recommend using good quality melting wafers or chocolate chips specifically designed for melting. These tend to set up smoothly and have a lovely sheen. If using regular chocolate chips, you might need to add a little bit of shortening or coconut oil to achieve a smoother consistency.
How do I get the red, white, and blue layers to look so neat?
The key is to let each layer of melted chocolate set completely before adding the next. You can speed this up by placing the Oreo balls in the refrigerator for about 10-15 minutes between dips. For the white chocolate layer, ensure you’re working with a smooth, lump-free consistency by stirring gently and continuously.
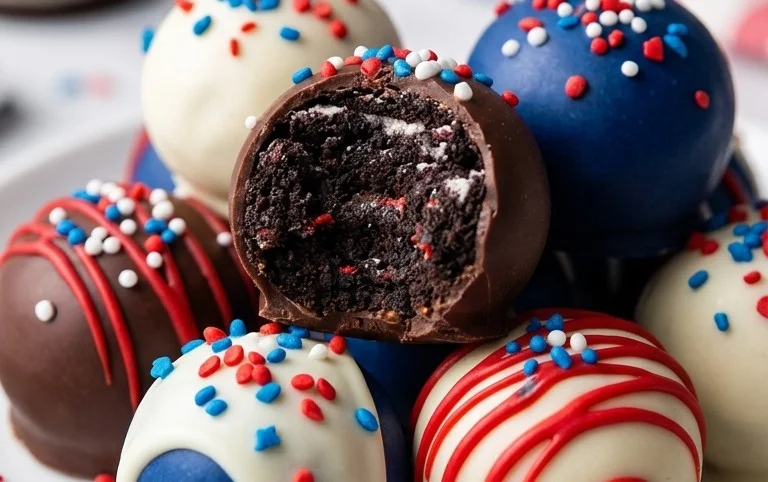
Patriotic Oreo Balls
Delicious and festive no-bake Oreo balls decorated in red, white, and blue for a patriotic celebration.
Ingredients
-
1 lb 2.12 oz Family Size package Oreo Cookies
-
8 ounce block cream cheese, softened
-
12 ounce bag red candy melts
-
12 ounce bag blue candy melts
-
⅓ cup Ghirardelli white melting wafers
-
White star confetti sprinkles
Instructions
-
Step 1
Crush Oreo cookies into fine crumbs using a food processor or by placing them in a zip-top bag and crushing with a rolling pin. -
Step 2
In a medium bowl, combine the Oreo cookie crumbs and softened cream cheese. Mix until well combined and a dough-like consistency forms. -
Step 3
Roll the mixture into 1-inch balls and place them on a baking sheet lined with parchment paper. Chill in the refrigerator for at least 30 minutes. -
Step 4
Melt the red candy melts according to package directions, usually in the microwave in 30-second intervals, stirring between each interval until smooth. Dip approximately half of the chilled Oreo balls into the melted red candy, ensuring they are fully coated. Return to the parchment-lined baking sheet. -
Step 5
Melt the blue candy melts according to package directions. Dip the remaining chilled Oreo balls into the melted blue candy, ensuring they are fully coated. Return to the parchment-lined baking sheet. -
Step 6
Melt the Ghirardelli white melting wafers according to package directions. Drizzle the melted white chocolate over the red and blue dipped Oreo balls for a decorative effect. -
Step 7
While the white chocolate is still wet, immediately sprinkle with white star confetti sprinkles. -
Step 8
Allow the candy melts and white chocolate to set completely at room temperature or in the refrigerator for faster setting.
Important Information
Nutrition Facts (Per Serving)
It is important to consider this information as approximate and not to use it as definitive health advice.
Allergy Information
Please check ingredients for potential allergens and consult a health professional if in doubt.