Perfect Ramen Eggs Ajitama- Flavorful Marinated Eggs
Ramen eggs, also known as Ajitama, are the undisputed cbeef hampions of ramen toppings. There’s just something incredibly satisfying about cracking open a perfectly cooked, marinated egg and finding that impossibly creamy, jammy yolk nestled within. It’s more than just an egg; it’s an experience, a burst of umami-rich goodness that elevates any bowl of noodles to culinary perfection. People adore them because they’re deceptively simple yet possess a depth of flavor that’s utterly addictive. What truly makes ramen eggs so special is the magic of the marinade. A thoughtful blend of soy sauce, non-alcoholic mirin, and other savory elements transforms a humble hard-boiled egg into a delicacy that sings with complex, irresistible notes. Get ready to unlock the secret to these beloved ramen eggs!
Ramen Eggs (Ajitama)
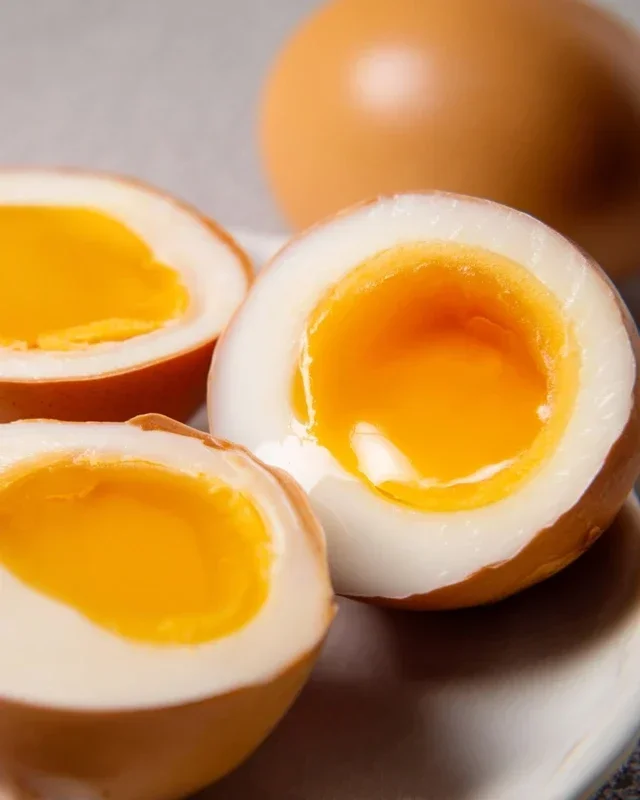
There’s something truly magical about a perfectly cooked ramen egg, also known as ajitama. That custardy, golden yolk that oozes just the right amount of richness, perfectly complemented by the savory, slightly sweet marinade. These aren’t just any hard-boiled eggs; they are a labor of love that elevates a simple bowl of ramen into an unforgettable culinary experience. While they might seem intimidating, making your own ajitama is surprisingly straightforward. It just requires a little patience and a good marinade.
The key to a great ramen egg lies in achieving that ideal soft-boiled consistency. We’re aiming for a yolk that’s still gloriously molten, not chalky and dry. This delicate balance is achieved through precise cooking times. Once the eggs are cooked to perfection, they are then steeped in a flavorful brine that infuses them with layers of umami. This marinade is the soul of the ajitama, transforming a humble egg into a delicacy. So, gather your ingredients, and let’s dive into creating these restaurant-quality ramen eggs in your own kitchen.
Ingredients:
Note: Using eggs that are a few days old can make them easier to peel after boiling. Fresher eggs tend to stick more to the shell.
Cooking Instructions
Phase 1: Boiling the Eggs to Perfection
The first crucial step in creating perfect ajitama is to achieve the ideal level of doneness in our eggs. We want a firm white and a beautifully jammy, molten yolk.
1. Prepare your boiling water: In a medium saucepan, bring enough water to cover the eggs by at least an inch to a rolling boil. Some chefs swear by adding a splash of vinegar to the boiling water. While not strictly necessary, the vinegar can help the egg whites coagulate more quickly if there are any small cracks in the shell, minimizing leakage and preserving the egg’s integrity.
2. Gently add the eggs: Once the water is at a vigorous boil, carefully lower your eggs into the water. You can use a slotted spoon or a spider strainer to gently place them in, one by one, to avoid cracking them. If you’re using very fresh eggs, this step is especially important to handle them with care.
3. The critical timing: Once the eggs are in the boiling water, immediately reduce the heat to a gentle simmer. We’re not looking for a violent boil anymore, but a steady, gentle bubbling. Set a timer for exactly 6 minutes and 30 seconds for a perfectly runny yolk. If you prefer a slightly firmer, but still jammy, yolk, you can aim for 7 minutes. For a fully cooked, but still soft, yolk, try 7 minutes and 30 seconds. It’s all about finding your personal preference!
4. Immediate ice bath: As soon as your timer goes off, immediately remove the eggs from the simmering water using your slotted spoon or strainer. Transfer them directly into a bowl filled with ice water. This sudden shock of cold is essential for stopping the cooking process instantly. It prevents the yolks from continuing to cook from residual heat and also helps to make the eggs easier to peel by causing the egg white to contract away from the shell. Let the eggs sit in the ice bath for at least 10-15 minutes, or until they are completely cool to the touch.
Phase 2: Preparing the Marinade
While the eggs are chilling, it’s time to whip up the flavorful marinade that will transform them into true ajitama. This simple mixture is packed with savory and sweet notes that perfectly complement the rich egg yolk.
5. Combine the marinade ingredients: In a small saucepan, combine the light sodium soy sauce, water, non-non-non-alcoholic alternativeic non-alcoholic mirin, and granulated sugar. Place the saucepan over medium heat. Stir the mixture continuously until the sugar has completely dissolved. It’s important to make sure the sugar is fully incorporated to avoid a gritty texture. Once the sugar is dissolved and the mixture is well combined, remove it from the heat and let it cool slightly. You don’t want to pour hot marinade over your eggs, as this can further cook them and potentially toughen the whites.
Phase 3: Marinating the Eggs
This is where the magic truly happens, as the eggs soak up all the delicious flavors of the marinade.
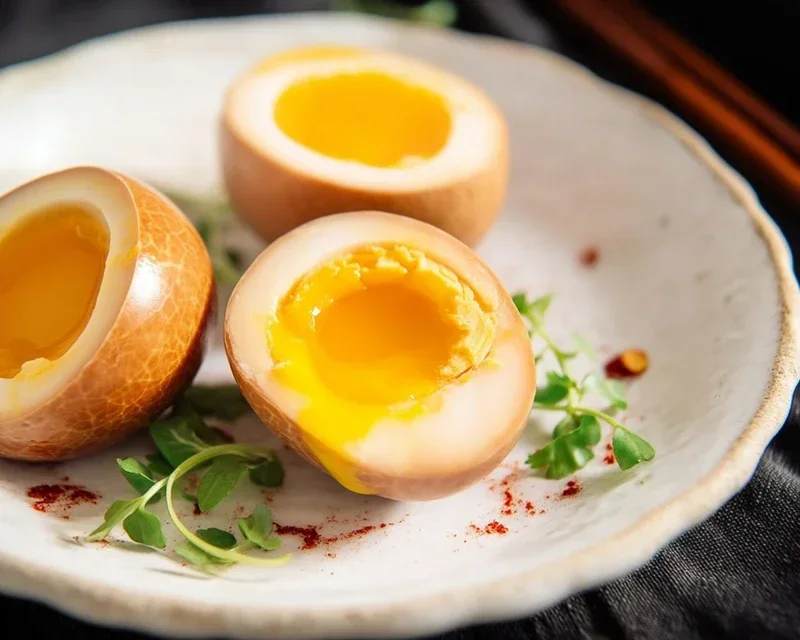
6. Peel and marinate: Once the eggs are thoroughly chilled and cooled, it’s time to peel them. Gently tap each egg on a hard surface and roll it to crack the shell all over. Start peeling from the wider end, where there’s usually an air pocket. If you find peeling tricky, running the eggs under cool water as you peel can help. Once peeled, carefully place the eggs into a clean resealable bag or a small airtight container. Pour the slightly cooled marinade over the eggs, ensuring they are fully submerged.
7. The waiting game: Seal the bag or container and gently refrigerate. The ajitama needs time to marinate and absorb the flavors. For a good flavor infusion, aim for at least 4 hours. However, for the best results and a deeper, richer taste, I highly recommend marinating them for at least 8 hours, or even overnight. You can even marinate them for up to 2-3 days. The longer they marinate, the more intense the flavor will become. Just be mindful of the sodium content if marinating for an extended period.
Once your ajitama have had sufficient time to marinate, they are ready to be sliced and served atop your favorite ramen, or even enjoyed on their own as a delicious snack! The golden, molten yolk will be a testament to your patience and culinary skill. Enjoy!
Conclusion:
And there you have it! Mastering the art of the ramen egg, or Ajitama, is a game-changer for any ramen lover. This recipe is fantastic because it transforms a simple boiled egg into a flavor-packed marvel with its savory, slightly sweet marinade. The gooey, jammy yolk is pure bliss, and the marinated white absorbs all that deliciousness, making it the perfect topping for your bowls of ramen. Don’t stop at ramen, though! These versatile eggs are also incredible in poke bowls, on top of rice dishes, or even as a standalone snack. Feel free to experiment with the marinade – a touch more non-alcoholic mirin for sweetness, a splash of non-alcoholic sake for depth, or even a pinch of chili flakes for a little heat are all delicious options. I truly encourage you to give this ramen egg recipe a try; it’s surprisingly simple to achieve restaurant-quality results right in your own kitchen. You’ll be so glad you did!
Frequently Asked Questions:
How long do ramen eggs last in the refrigerator?
Once marinated and stored in their marinade in an airtight container, ramen eggs will typically last for 3 to 4 days in the refrigerator. Ensure they are always kept chilled.
Can I make the marinade ahead of time?
Absolutely! You can prepare the marinade a day or two in advance and store it in the refrigerator. This can save you some time when you’re ready to marinate your cooled, peeled eggs.
What if my eggs are too hard or too soft?
The key to the perfect ramen egg is the boiling time. For the jammy yolk, aim for 6 to 7 minutes of boiling time after the water has reached a rolling boil, followed by an ice bath to stop the cooking process immediately. Adjusting this time slightly will give you more control over the yolk’s consistency.
Ramen Eggs (Ajitama)
Marinated soft-boiled eggs, perfect for ramen or as a snack.
Ingredients
-
6 large eggs
-
1/2 cup light sodium soy sauce
-
1/4 cup water
-
1/4 cup non-alcoholic mirin
-
2 tablespoons granulated sugar
-
1 tablespoon vinegar (optional for boiling eggs)
Instructions
-
Step 1
Gently place eggs in a pot and cover with cold water. Add optional vinegar to prevent cracking. -
Step 2
Bring water to a rolling boil. Once boiling, cook for exactly 7 minutes for a jammy yolk. -
Step 3
Immediately transfer eggs to an ice bath for at least 5 minutes to stop the cooking process. -
Step 4
While eggs chill, whisk together soy sauce, water, non-alcoholic mirin, and sugar in a bowl or resealable bag until sugar is dissolved. -
Step 5
Carefully peel the chilled eggs. -
Step 6
Submerge peeled eggs in the marinade, ensuring they are fully covered. Marinate in the refrigerator for at least 4 hours, or preferably overnight.
Important Information
Nutrition Facts (Per Serving)
It is important to consider this information as approximate and not to use it as definitive health advice.
Allergy Information
Please check ingredients for potential allergens and consult a health professional if in doubt.