Cheesy Zucchini Breadsticks- Easy & Delicious Recipe
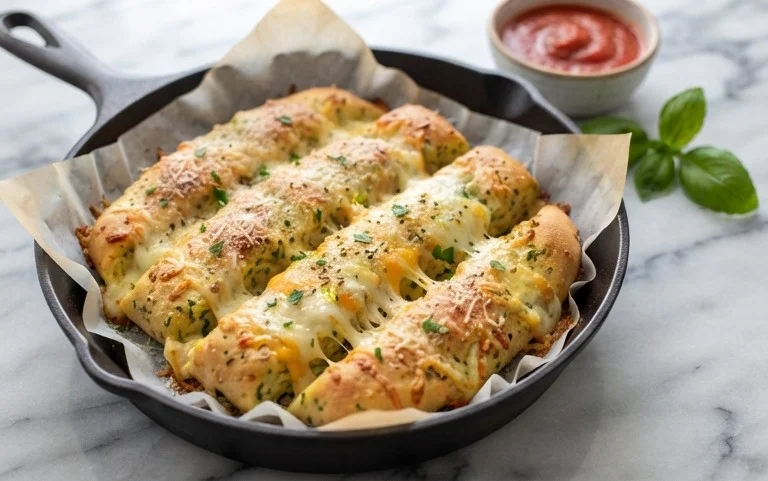
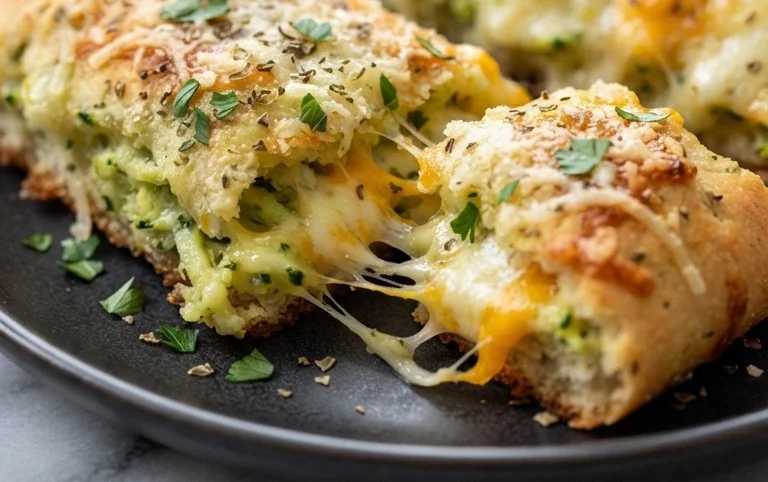
Cheesy Zucchini Breadsticks are about to become your new obsession, and I can hardly wait for you to try them! Imagin extracte this: warm, golden-brown breadsticks, subtly infused with the goodness of fresh zucchini, then generously coated in a melty, savory cheese blend. It’s the perfect appetizer, a delightful side dish, or even a surprisingly satisfying snack. We all know and love the classic breadstick for its comforting familiarity, but these Cheesy Zucchini Breadsticks elevate it to a whole new level. The secret? The zucchini adds an incredible moisture and a hint of earthy sweetness that perfectly balances the rich, salty cheese. Plus, who can resist that irresistible cheesy pull? They’re surprisingly simple to make, yet they deliver a gourmet experience that will have everyone asking for the recipe. Get ready to fall in love with this simple yet spectacular creation!
Cheesy Zucchini Breadsticks
Hello fellow home cooks! Today, I’m thrilled to share a recipe that’s a fantastic way to use up that garden bounty of zucchini or simply to add a delicious and relatively healthy twist to a classic snack. These Cheesy Zucchini Breadsticks are incredibly easy to make, surprisingly satisfying, and disappear faster than you can say “pass the dip!” They’re perfect as an appetizer, a side dish to your favorite Italian meal, or even a light lunch. The zucchini adds moisture and a subtle flavor that pairs beautifully with the salty, sharp cheeses. Get ready to impress yourself and your loved ones with these delightful little bites!
Ingredients:
Instructions:
The first crucial step in creating these fantastic breadsticks is preparing your zucchini. You’ll want to start by washing your zucchini thoroughly. Then, using a box grater or the grating attachment on your food processor, grate the zucchini. The goal is to get roughly 4 cups of grated zucchini. Don’t worry if it’s not exact; this recipe is forgiving. Once grated, the zucchini will release a significant amount of liquid. This is where a little extra effort goes a long way. Place the grated zucchini in a fine-mesh sieve set over a bowl, or even better, wrap it in a clean kitchen towel or cheesecloth and squeeze out as much excess moisture as possible. This step is vital to prevent your breadsticks from becoming soggy. The drier the zucchini, the crispier and more delightful your breadsticks will be. Think of it as giving them a good “pat down” to remove any unnecessary water. Set the squeezed zucchini aside.
Now, let’s bring our flavors together. In a medium-sized mixing bowl, you’ll combine all of your prepared ingredients. Add the squeezed grated zucchini to the bowl. Next, add the first measure of shredded mozzarella cheese – that ½ cup. Follow this with the finely shredded Parmesan cheese. The combination of mozzarella and Parmesan provides a wonderful cheesy base that melts beautifully and offers a lovely depth of flavor. Crack in your large egg; this will act as our binder, holding all the ingredients together. Now, let’s talk seasonings. Sprinkle in the dried Italian seasoning. This blend typically includes oregano, basil, thyme, and rosemary, which are perfect partners for zucchini and cheese. Add the ½ teaspoon of salt and the ½ teaspoon of garlic powder for that essential savory kick. Mix everything together thoroughly with a spoon or spatula until it’s well combined. You want to ensure that the cheese, seasonings, and egg are evenly distributed throughout the zucchini mixture. Don’t be afraid to get your hands in there if it makes mixing easier – it’s a very tactile process!
Once your zucchini mixture is beautifully combined, it’s time to add the star of the show for that extra gooeyness – the remaining 1 cup of finely shredded mozzarella cheese. Gently fold this extra mozzarella into the mixture. This is where you’ll start to see those delightful cheesy strands forming, promising a truly irresistible breadstick. This second addition of mozzarella is key to getting those wonderfully melty, stretchy cheese pulls that we all love. Ensure this cheese is well incorporated but try not to overmix at this stage. We want those pockets of melty cheese!
Preparing for Baking
Preheating your oven is an essential step for achieving perfectly baked breadsticks. Set your oven temperature to 400 degrees Fahrenheit (200 degrees Celsius). While the oven is preheating, you’ll need to prepare your baking sheet. Line a baking sheet with parchment paper or a silicone baking mat. This prevents the breadsticks from sticking and makes for a much easier cleanup. If you don’t have parchment paper, you can lightly grease the baking sheet with a little olive oil or cooking spray, but parchment paper is highly recommended for optimal results. Now, it’s time to shape our breadsticks. You can either drop spoonfuls of the mixture onto the prepared baking sheet, shaping them into little logs, or if you prefer more uniform breadsticks, you can use a cookie scoop. Aim for a size that’s about 2-3 inches long and about ½ inch thick. Don’t overcrowd the baking sheet; leave a little space between each breadstick so they can cook evenly and develop a nice crust. If the mixture feels a little sticky, you can lightly dampen your hands with water to help with shaping.
Baking to Golden Perfection
Now for the exciting part – baking! Carefully place the prepared baking sheet into your preheated oven. Bake for approximately 20 to 25 minutes. The exact baking time will depend on your oven and the size of your breadsticks. You’re looking for them to be golden brown on the edges and lightly browned on top. The cheese should be melted and bubbly. During the last 5 minutes of baking, keep a close eye on them. If they start to brown too quickly on top, you can loosely tent the baking sheet with aluminum foil. Once they’re golden and delicious, remove the baking sheet from the oven. Let the breadsticks cool on the baking sheet for a few minutes before transferring them to a wire rack to cool slightly more. This cooling period allows them to set up properly. Serve them warm for the best experience. They are absolutely delightful on their own, or you can serve them with your favorite marinara sauce for dipping, a garlic aioli, or even a simple ranch dressing. Enjoy these incredibly cheesy and flavorful zucchini breadsticks!
Conclusion:
I truly hope you’ve enjoyed learning how to make these cheesy zucchini breadsticks! This recipe is a fantastic way to sneak in some extra vegetables while creating an incredibly delicious and satisfying snack or appetizer. They’re wonderfully tender on the inside with a delightful, golden-brown cheesy crust that will have everyone reaching for more. Whether you’re looking for a crowd-pleasing party starter, a fun side dish for movie night, or even a savory breakfast option, these breadsticks deliver on all fronts. They’re quick to prepare, use simple ingredients, and the aroma that fills your kitchen as they bake is simply irresistible.
Don’t be afraid to get creative with serving! I love serving mine warm with a marinara dipping sauce, but they’re also amazing with a garlic herb aioli or even just plain. For variations, consider adding a pinch of red pepper flakes to the batter for a touch of heat, or a sprinkle of dried Italian herbs for an extra layer of flavor. You could also experiment with different cheeses, like a sharp cheddar or a spicy Monterey Jack, to change up the taste profile. I encourage you to give this recipe a try – I’m confident you’ll be delighted with the results!
Frequently Asked Questions:
Can I make these cheesy zucchini breadsticks ahead of time?
While they are best enjoyed fresh and warm, you can prepare the batter a few hours in advance and store it in the refrigerator. You may need to bake them for a slightly longer time if they are coming straight from the fridge. Reheating leftovers is also an option, though they might lose a bit of their crispness.
My zucchini is very watery. How can I prevent soggy breadsticks?
It’s crucial to squeeze out as much moisture as possible from your grated zucchini. After grating, place it in a cheesecloth or a clean kitchen towel and wring it out firmly. This step is key to achieving a good texture and preventing your breadsticks from becoming soggy.
Can I freeze baked cheesy zucchini breadsticks?
Yes, you can freeze the baked and cooled breadsticks. Wrap them tightly in plastic wrap and then place them in a freezer-safe bag or container. To reheat, bake them in a preheated oven at around 350°F (175°C) until heated through and crispy.
Cheesy Zucchini Breadsticks
Savory and cheesy breadsticks made with grated zucchini, perfect as an appetizer or side dish.
Ingredients
-
4 cups grated zucchini (about 2 large zucchini)
-
1/2 cup shredded mozzarella cheese
-
1/3 cup finely shredded Parmesan cheese
-
1 large egg
-
1 teaspoon dried Italian seasoning
-
1/2 teaspoon salt
-
1/2 teaspoon garlic powder
-
1 cup finely shredded mozzarella cheese
Instructions
-
Step 1
Preheat oven to 400°F (200°C). Line a baking sheet with parchment paper. -
Step 2
In a medium bowl, combine the grated zucchini, 1/2 cup shredded mozzarella, Parmesan cheese, egg, Italian seasoning, salt, and garlic powder. Mix well. -
Step 3
Spoon the mixture onto the prepared baking sheet, spreading it into a rectangular shape, about 1/2 inch thick. -
Step 4
Sprinkle the remaining 1 cup of finely shredded mozzarella cheese evenly over the top. -
Step 5
Bake for 15-20 minutes, or until golden brown and the cheese is melted and bubbly. -
Step 6
Let cool slightly, then cut into breadstick shapes using a pizza cutter or knife. Serve warm.
Important Information
Nutrition Facts (Per Serving)
It is important to consider this information as approximate and not to use it as definitive health advice.
Allergy Information
Please check ingredients for potential allergens and consult a health professional if in doubt.