Cookie Ice Cream Sandwiches Chipwich Style
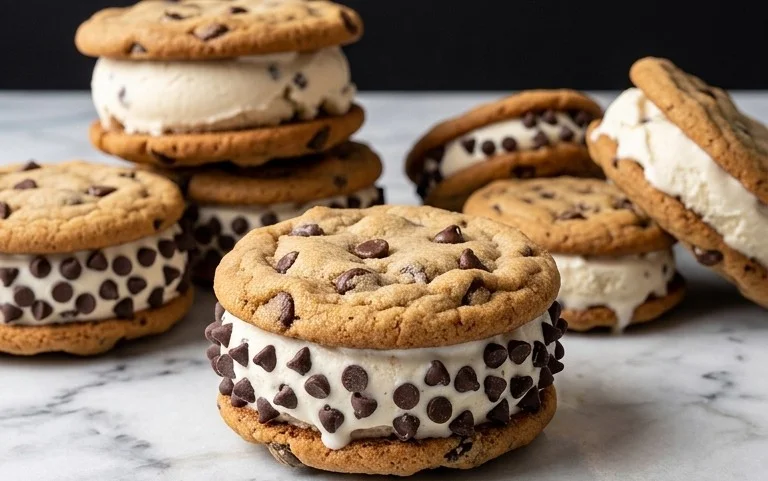
Cookie ice cream sandwiches, reminiscent of those iconic Chipwich treats, are pure summertime bliss. There’s something undeniably magical about the combination of a crisp, chewy cookie embracing a creamy, frozen center. We all have those childhood memories tied to these delightful frozen desserts, don’t we? They offer a perfect balance of textures and flavors – the satisfying crum extractb of the cookie meeting the cool, smooth sweetness of ice cream. What makes these cookie ice cream sandwiches truly special is their versatility. You can play with different cookie flavors, from classic chocolate chip to decadent double chocolate, and pair them with your favorite ice cream. They’re not just a dessert; they’re an experience, a nostalgic journey, and a guaranteed crowd-pleaser. Get ready to recreate that beloved Chipwich magic right in your own kitchen!
Ready to dive into cookie ice cream sandwich perfection?
Let’s get started!
Ingredients:
Crafting the Perfect Cookie Ice Cream Sandwich
There’s something undeniably special about a classic cookie ice cream sandwich. It’s a nostalgic treat, a perfect balance of crisp cookie and creamy ice cream, and a delightful way to beat the heat. Today, we’re going to recreate that iconic Chipwich-style magic in your own kitchen. Forget store-bought; these homemade versions are infinitely customizable and utterly delicious. We’ll be making perfectly chewy, chocolate chip-studded cookies that are the ideal vessel for your favorite ice cream. The key is to get the cookie texture just right – sturdy enough to hold its own against the melting ice cream, but tender and flavorful enough to be enjoyed on its own.
The Cookie Dough: The Foundation of Flavor
Our cookie dough starts with a precise blend of dry ingredients. All-purpose flour provides the structure, while cornstarch is our secret weapon for achieving that wonderfully soft and chewy texture. Don’t skip the baking soda and salt; they work together to give the cookies their lift and balance the sweetness.
The magic truly happens when we cream together the softened butter and both brown and granulated sugars. Creaming is more than just mixing; it’s about incorporating air into the butter and sugar mixture, which will contribute to the cookies’ rise and tender crum extractb. Make sure your butter is truly softened, not melted. It should yield slightly when pressed with your finger. This ensures it can properly emulsify with the sugars, creating a light and airy base. Gradually adding the brown sugar and granulated sugar, and creaming until light and fluffy, is crucial for the best texture. The brown sugar brings moisture and a lovely caramel note, while the granulated sugar contributes to crisp edges.
Next, we’ll introduce the wet ingredients. A large egg and an extra egg yolk bring richness and help bind the dough together. The extra yolk adds even more fat, contributing to a chewier cookie. And of course, the pure vanilla extract is non-negotiable for that classic, comforting flavor. Whisk these together until well combined before adding them to the creamed butter and sugar mixture.
Finally, we’ll gently incorporate the dry ingredients into the wet. It’s important not to overmix at this stage. Mix just until the flour streaks disappear. Overmixing can develop the gluten in the flour too much, resulting in tough cookies. To finish, we fold in those glorious mini semi-sweet chocolate chips. These little bursts of chocolate are essential to the cookie’s identity.
Shaping and Baking the Perfect Cookies
Once your dough is ready, it’s time to shape it into perfectly portioned cookies. You can do this by rolling the dough into balls and flattening them slightly, or by using a cookie scoop for uniform size. Aim for cookies that are about 2 to 2.5 inches in diameter before baking. Remember that these cookies will spread as they bake, so give them plenty of space on your baking sheets. Lining your baking sheets with parchment paper will prevent sticking and make for easy cleanup.
Bake the cookies at 375°F (190°C) for about 9 to 11 minutes, or until the edges are lightly golden brown and the centers still look slightly soft. This is the key to chewy cookies! They will continue to cook on the baking sheet as they cool. It’s tempting to overbake them for a crispier cookie, but for ice cream sandwiches, a slightly underbaked center is precisely what we’re going for. You want them to be soft enough to bite through easily once they’re filled with ice cream.
Let the cookies cool on the baking sheet for a few minutes before transferring them to a wire rack to cool completely. This step is critical. Trying to assemble your ice cream sandwiches with warm cookies will result in a melty, gooey mess before you even get to enjoy them. Patience is a virtue, especially when delicious ice cream sandwiches are the reward!
Assembling Your Masterpieces
While your cookies are cooling, it’s time to prepare your ice cream. Take your vanilla ice cream (or your chosen flavor!) out of the freezer and let it soften slightly. You want it to be scoopable but not melted. If it’s too hard, you’ll struggle to spread it evenly, and if it’s too soft, it will ooze out everywhere.
Once the cookies are completely cool, lay half of them flat on a clean surface. Scoop a generous portion of ice cream onto the center of each of these cookies. You can use an ice cream scoop, or simply a spoon, to get a nice mound of ice cream. Then, gently place another cookie on top, pressing down slightly to spread the ice cream to the edges.
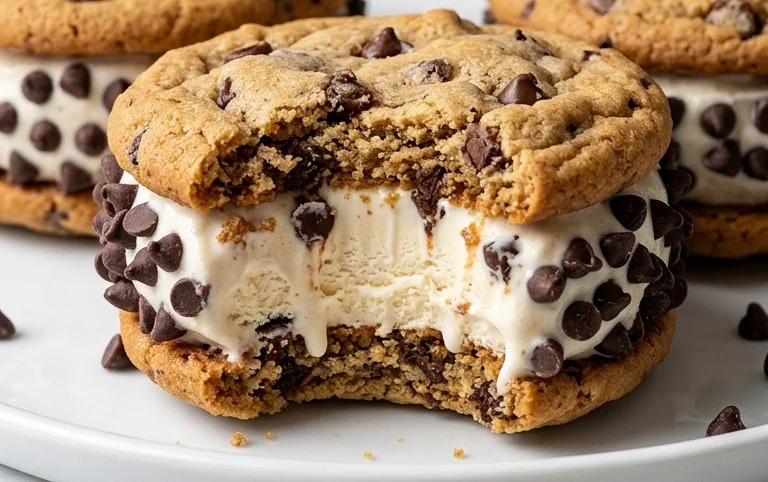
Now for the fun part: the finishing touches! This is where you can get creative and make your ice cream sandwiches truly your own. You can roll the exposed ice cream edges in mini chocolate chips, colorful sprinkles, or finely chopped nuts. This not only adds a delightful crunch and extra flavor but also helps to seal the edges and make them look as good as they taste. Have a plate ready with your chosen toppings, and gently press the sides of the assembled sandwiches into them.
Enjoying Your Homemade Treat
Once assembled, it’s best to wrap each cookie ice cream sandwich individually in parchment paper or plastic wrap and pop them back into the freezer for at least 30 minutes to firm up. This ensures they’re solid and easy to handle when you’re ready to eat them. These are best enjoyed within a week or two for optimal texture and flavor. Gather your friends and family, unwrap these delightful creations, and savor the taste of homemade bliss. These cookie ice cream sandwiches are a guaranteed crowd-pleaser!
Conclusion:
And there you have it! You’ve successfully recreated those iconic, delightful Cookie Ice Cream Sandwiches, reminiscent of the beloved Chipwich. This recipe is truly fantastic because it allows you to customize every element, from the type of cookie to the flavor of ice cream and even the toppings. It’s a simple yet incredibly satisfying dessert that brings smiles to faces of all ages. Perfect for a summer treat, a birthday party, or just because, these homemade delights are sure to be a hit.
For serving suggestions, I love them best right after assembly when the cookies are still slightly soft and the ice cream is perfectly firm. However, they also hold up beautifully if frozen individually for later enjoyment – just let them thaw for a minute or two before diggin extractg in. Don’t be afraid to get creative with variations! Swap chocolate chip cookies for sugar cookies, peanut butter cookies, or even double chocolate cookies. Experiment with different ice cream flavors like mint chocolate chip, strawberry, or coffee. Rolling the edges in sprinkles, chopped nuts, or mini chocolate chips adds an extra layer of fun and texture.
I wholeheartedly encourage you to give this Cookie Ice Cream Sandwich recipe a try. It’s a wonderfully rewarding baking project that delivers on both taste and nostalgic charm. You’ll be amazed at how easy it is to create these gourmet-style treats in your own kitchen. Enjoy every delicious bite!
Frequently Asked Questions:
Can I make the cookies ahead of time?
Absolutely! The cookies can be baked a day or two in advance and stored in an airtight container at room temperature. This makes assembly on ice cream sandwich day even quicker and easier.
What if I don’t have a round cookie cutter?
No problem! You can simply press your ice cream into a square or rectangular shape, or even use a knife to gently shape it to fit your cookies. Alternatively, you can just place a scoop of ice cream between two cookies and gently press them together – the shape isn’t as important as the delicious taste!
How long can I store these in the freezer?
Properly wrapped cookie ice cream sandwiches can be stored in the freezer for up to 2-3 weeks. Wrap each sandwich tightly in plastic wrap, then place them in a freezer-safe container or bag to prevent freezer burn.
Cookie Ice Cream Sandwiches (Like a Chipwich!)
Create delicious homemade ice cream sandwiches using chocolate chip cookie dough and your favorite ice cream, reminiscent of classic Chipwich treats.
Ingredients
-
2 and 1/4 cups (281g) all-purpose flour (spooned & leveled)
-
1 and 1/2 teaspoons cornstarch
-
1 teaspoon baking soda
-
1/2 teaspoon salt
-
3/4 cup (12 Tablespoons; 170g) unsalted butter, softened to room temperature
-
3/4 cup (150g) packed light or dark brown sugar
-
1/2 cup (100g) granulated sugar
-
1 large egg + 1 egg yolk, at room temperature
-
2 teaspoons pure vanilla extract
-
1 and 1/4 cups (225g) mini semi-sweet chocolate chips
-
3 cups (about 540g) vanilla ice cream (or your desired flavor)
-
1 cup mini chocolate chips (180g), sprinkles (150g), or finely chopped nuts (100g)
Instructions
-
Step 1
In a medium bowl, whisk together the flour, cornstarch, baking soda, and salt. Set aside. -
Step 2
In a large bowl, cream together the softened butter, brown sugar, and granulated sugar until light and fluffy. Beat in the egg, egg yolk, and vanilla extract until well combined. -
Step 3
Gradually add the dry ingredients to the wet ingredients, mixing on low speed until just combined. Stir in the mini semi-sweet chocolate chips. -
Step 4
Preheat your oven to 375°F (190°C). Line baking sheets with parchment paper. Roll dough into 1-inch balls and place 2 inches apart on the prepared baking sheets. Flatten each ball slightly. -
Step 5
Bake for 10-12 minutes, or until the edges are golden brown and the centers are still slightly soft. Let cool on the baking sheets for a few minutes before transferring to a wire rack to cool completely. -
Step 6
Once cookies are completely cool, scoop about 1/4 cup of softened ice cream onto the flat side of one cookie. Top with another cookie, flat side down, to create a sandwich. -
Step 7
Gently press the edges of the sandwich into your chosen toppings (mini chocolate chips, sprinkles, or chopped nuts). -
Step 8
Wrap each sandwich tightly in plastic wrap and freeze for at least 2 hours, or until the ice cream is firm.
Important Information
Nutrition Facts (Per Serving)
It is important to consider this information as approximate and not to use it as definitive health advice.
Allergy Information
Please check ingredients for potential allergens and consult a health professional if in doubt.